Act 1 is divided into 9 areas
Area 1: Ground Zero
After the introductory sequence you will take control of Snake, as soon as you get the chance crawl under the truck in front of you to collect a ration; then go under the other truck to activate another scene. If you can't get under the truck, or aren't quick enough, Snake will move on his own.
As soon as you regain control, pick up the AK102 assault rifle (very useful because unlike the weapons our enemies will use, this one has no ID code and therefore does not have to be unlocked to be used); be careful not to shoot the soldiers around you because they are your allies. You will find yourself in front of a crossroads, the choice to go left or right will only affect your position in the next movie (in this movie the very dangerous Gekko will make their appearance, who are close relatives of the old Metal Gears; little advice: if one he discovers you of these enemies, you begin to escape and hide). Resumed the game, go back while paying attention to the enemies of Snake that are nearby and head towards the broken wall which is where the road bends to the left. Resist the temptation to eliminate these new enemies, especially since you don't have the right arsenal to destroy this new generation of machines; wait for the Gekko to pass you and then resume the advance. When he is with his back to you, lower yourself completely to the ground and slowly advance undetected, crossing the street and entering the other building. Go through the entire building until you reach a new building. As you enter, wait until the Gekko that is next to you moves away, then quickly advance to the next area; you will activate a series of scenes at the end of which your trusted friend Otacon will call you, who will explain to you how the perhaps most useful object of the whole game works: the OctoCamo, a special camouflage that changes the color based on the conformation and coloring of the ground.
Area 2: North-West Sector of the Red Zone
At the end of the discussion with Otacon you will find yourself in a path, go to the end of this and you will find a dead soldier. Collect the ammo for your AK and make your way back until you reach the main road. As soon as you have reached the main road, quickly enter the building which is immediately on the right. A sequence will be activated that will show the arrival of a vehicle with PMCs on board. Go through the building slowly avoiding being discovered, be careful and do not exit the building, but move slowly until you reach a door; then crouch down and crawl through the hole next to the door. Crossed the hole you will find a tablet, then reach the road, always crawling in such a way as not to be discovered, and position yourself between the wall and the destroyed car, this is because the vehicle used by the PMC uses a sensor to find the enemies; as soon as you can enter the door on your right. Inside this house is a dead soldier (when you see dead soldiers, always examine them) and a shotgun to collect as it gives more ammo for your AK; on the left you will find a room where there are two dead soldiers, examine them for ammo and a Molotov cocktail, and there is also a tablet on the bed. To go forward you have to lie down completely on the ground and continue to crawl to pass under the rubble placed in front of the dead soldier seen previously; after passing the rubble you will find a rebel soldier who is about to be executed by a PMC, in this case you can let him do it or kill him either with a well-aimed blow with your trusty AK or with the mythical CQC (fighting method previously used by The Boss and then passed on to his two disciples, Liquid and Solid). After making your choice, proceed along the alley until you find boxes at the end of the street. There you will see a lowered soldier, be careful and activate your OctoCamo, then wait for the lowered guard to leave and wait for a PMC to pass, after which you can advance always checking that the area is clear; Exit the building, proceeding to the right (now you can advance faster), until you reach a door behind a large container: go through it to arrive in a new area.
Area 3: Red Zone
This area is closely guarded by PMC troops, so try not to attract their attention because if you spot it you will hardly be able to make yourself invisible.
Having taken control of Snake, wait for the PMCs to move away to move on. To continue take the road on the right but you will always have to crawl so that the OctoCamo does its job, always paying attention to the PMC soldiers; after a short stretch of road enter the building on your right, continue inside the building until you reach the third room and then return to the street (always paying attention to the PMC soldiers and moving only by crawling) to continue up to an alley blind man who is on the right. If this is the case, it is also advisable to wait a bit while lying on the ground so as not to be discovered by the PMC troops. As soon as you have a clear road, enter the building to the right of the dead end; after entering this building, a sequence will start in which Snake will make the acquaintance with the MK 2 (a derivative of the mythical Metal Gear only that, unlike its ancestor, this will be at your side) that will allow you to explore different areas of otherwise inaccessible game. In addition, you will be given an Operator pistol with attached silencer (excellent if you don't want to be discovered by the PMCs) and the solid eye, a multi-function viewer of Snake that will take the place of the missing eye to the protagonist.
At the end of the sequence we return to the scene; you will witness the real struggle between rebels and PMC, which was anticipated from the opening scene. Resumed Snake's command, you can decide whether or not to enter the battle: if you have decided to help the rebels this will facilitate entry into their headquarters and you can then freely explore the areas controlled by the militiamen; instead, if you do not want to intervene, just follow the road to the south-east where you will find a PMC patrol. Leave it to them, you stay on the sidelines and continue crawling along the right side of the road, always being careful not to get caught. More or less halfway down the street you will find an opening in a house on your right, enter and go through the whole structure, which will take you behind the lines of resistance of the rebels. Always cautiously go to the door of the building opposite to access the rebel den.
Area 4: The Lair of the Rebels
If you have helped the militiamen, the lair will be completely at your disposal, so you can cross it without problems.
If, on the other hand, you have done like me, and you have not helped the militiamen, crossing the militia lair will be complicated if not impossible.
As soon as you enter, move to the small closet at the bottom left, always lying down to avoid being discovered by the guard who is back to your position. As soon as the guard has moved away always proceed with caution leaving this area behind. Now you will find yourself in a kind of tunnel, with a small recess on the right, enter quickly otherwise you will be discovered by the soldiers. Continuing, you will enter a room not guarded by the rebels, where you can find food (rations and noodles). Leaving the room you will find a space where you can hide right on your right, just before the tunnel continues on the right. Always stay crouched and approach the wall to avoid the passing patrol. As soon as you are safe, continue on until you arrive in an infirmary, where you can find wounded militiamen being treated by their comrades. Crawl behind these so you don't get caught. The corridor that follows leads to two dead ends, choose one and blend in with the OctoCamo, waiting for a patrolling guard to pass by, then checking carefully if you are camouflaged, activate the MK 2 to follow the guard through the door and trace a route of the its path. However, if you don't want to waste time, just wait for it to go and go through the door. In the room you enter you will find two militiamen discussing a piece of an enemy weapon. If you make little noise and pay attention, you shouldn't have any problems, however it is better to approach the right wall and proceed slowly in such a way as to go unnoticed. Go up the stairs at the exit of the room and you will find two militiamen, but if you crawl to the left they should not see you. Wait a few seconds and the alarm will go off; you will then see the militiamen running out to help their comrades. At this point you have no more problems and you can take everything you need without being discovered (ammunition, rations, Molotov cocktails). So go up the last stairs to meet a really nice friend: Drebin.
Drebin is an arms dealer and has the ability to unlock all weapons with ID (basically those of the PMC), he also buys and sells weapons; in my humble opinion he is the most helpful person in the game !!!
Area 5: Urban Ruins
The urban ruins area is completely free of enemies, but it's also very easy to get lost.
As soon as you have regained control of our protagonist, go to your right and go up the stairs. Climb up to the end to get an AK, then go back a bit until you find a passage. Here you will find a scope, an RPG grenade launcher and a mine; Climb the stairs again and drop into the opening: you will fall on the roof of the adjacent house. Proceeding to the right you will find two militiamen, wait for them to be killed by the PMCs and then you can continue without problems, entering an opening on the right. Go up and when the passage gets too narrow, hold on to the wall, the exit of the area is a little further on and you just have to drop and continue to get to the new area. You can easily follow the tracks on the ground, to easily reach the exit.
Area 6: City Center
Arriving in the city center, after the scene of Jonny (a character who as the game progresses will be introduced by a dear friend ...) who had urgent needs, a petrol can is added to our inventory (who has played the other Metal Gear can remember the legendary box of the first ...) which will serve us, if used properly, to pass this area without problems. In fact it can be used as a "cover", with Snake walking from inside the bin, but be careful: the enemies are not idiots and if they see a bin moving they will immediately inspect. Or it can also be used to be thrown at enemies (I don't recommend using it like this though, because the area is full of enemies and it would be better to stay in stealth mode).
However, as soon as you take control of Snake, crawl forward keeping as far to the right as possible. As soon as you can, turn right and follow the road that always goes to the right (be careful because here you have no allies and therefore avoid being seen). I highly recommend buying a nice sniper rifle with its silencer from the Drebin shop, in order to make as little noise as possible (tip: being mainly a stealth mission, put the silencer in any weapon at your disposal). Following the road to the right you will arrive at a spot where a sniper is positioned (not as formidable as the End, but which can still do a lot of harm). My advice is to take it down, it is located high up right in front of you (however with the Solid Eye you should be able to track it very easily). As soon as you can turn left into a small road that joins the main road with the road you come from. In the middle of this road, turn right. This will blow up some enemies and take you back to the main road. Always crawl forward when there are enemies nearby, until you reach the point indicated on the map (towards the end it is better to crawl in the middle of the road, since your enemies will be occupied by a PMC air attack). Open the door and you will enter the new area.
Area 7: Palazzo degli Albori
The building you entered is uninhabited, so you can take your time to find items (watch out for mines though). Small tip: if you don't want to risk hurting yourself with mines, just activate the night vision device, which will allow you to see everything much better. I highly recommend that you turn around the whole palace because you will have to go back in very different circumstances as you will also have to beware of the enemy, so collect or detonate every mine in the palace in order to avoid problems later.
As soon as you enter, send the MK 2 on a reconnaissance throughout the ground floor. On the table you will find an AK while at the bottom right you will find a Claymore mine ready to explode (for experts it will be easy to deactivate it, for those who have never played Metal Gear Solid just swipe over the mine to make it your weapon). These are the only objects on the ground floor. Go back to the door you entered and go up the stairs immediately to the right: beware there is a sleep mine (it deactivates in the same way as the Claymore), after which keep going up until you reach the first floor. On the first floor if you follow the balcony on the left you will find another claymore positioned and another object, while if you go to your right; near the crates is another claymore, continuing enter the bathrooms to get a smoke grenade. Pay attention in the foreground to a sensor with lasers, as soon as you activate it you will be killed, however our dear friend Otacon will warn us first of the danger.
Go back and go up the stairs to go to the second floor, halfway up you will find yet another bomb ready to explode. After you have turned the second floor and collected all the available items, go away; you do not have to take the usual stairs but those placed on the other side of the floor. Go up the stairs without worrying about any bombs as this is the only ramp that is free. Arrived on the third floor, follow the only possible path until you reach a counter, watch out for the sleep bomb; climb over the counter to get some ammunition and a ration of tagliolini. Then continue through the door at the end of the room to the right of the counter, just ahead of where you entered earlier. As soon as you cross the gap, a scene will start, in which you will reunite with an old friendship.
After meeting Meryl and her team, you will be attacked by a special PMC team called Rane. Be careful not to kill any member of Meryl's team or get killed. Your job is to follow Meryl's team and if possible protect their backs. Eliminate as many frogs as possible or, if you are trying to finish the game without killing, just aim at the head of the frogs with the pistol loaded with tranquilizers.
Area 8: Sundial Crescent
After saying goodbye to Meryl and after talking to Otacon, proceed through the debris in front of you. Follow the only path available by climbing over the crates that will obstruct the passage. As soon as you reach the main road, be careful not to be discovered by both the rebels and the PMC troops. Advance as far to the right as possible, but be careful of the rebels, as some of them are hidden. Follow the road waiting for the rebels to advance, always hiding and being careful not to be seen. As soon as you see the first porch, move to the left of the street, if necessary by killing some rebels. As soon as you get to the left side of the road, look for a blue van and then take that little road. Follow the road and wait for the rebels to overtake you, if nothing happens help the rebels to kill some PMC (of course without being seen) and then after they have passed you too. Always keeping to the left you will find a staircase; go up and continue until you reach the end, then go down to reach the road. Now a scene will activate that will feature 4 beings, called Beasts, who will kill the PMCs who try in vain to defeat them (of course these will be various bosses that you will have to face during the game; let's say that this scene is a taste of the power of the beasts)
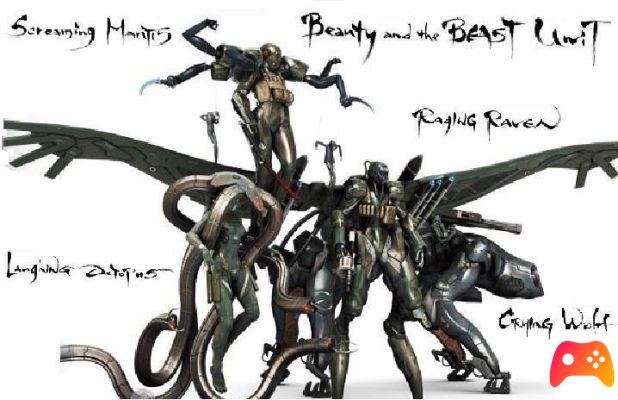
Area 9: Millennium Park
When you regain control of Snake you can safely take all the weapons of the militiamen. Then follow the road paying attention to the two PMCs on patrol (you can easily eliminate them or, being very careful, pass them by crawling naturally without being seen). Following the road you will arrive at the Millennium Park; beware of the PMC troops (you should take them out comfortably from a distance with a nice sniper rifle). After the park you will reach the field where Liquid is located (for those who do not know Liquid is Solid's brother). As always, watch out for the guards and in stealth mode, kill the 5 guards who control this place. Once this is done, reach the point on the map by going to the right of this deposit. On the right side of the depot there is a red door, open it and continue. Going through the door will trigger a non-playable scene that will present the antagonist of the game, Liquid Ocelot (yes, it is the body of Ocelot controlled by Liquid) and Dr. Naomi (famous since the first Metal Gear for the development of the FOXDIE virus)
You have completed Act 1.


