1 - THE AMBUSH
TREASURES: 0
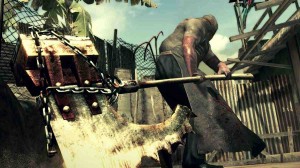
You will start your adventure in Uncharted on a boat in Panamanian waters where you will find the coffin of Sir Francis Drake with a lot of surprise, unfortunately you will not be able to enjoy the discovery as you will be attacked by pirates. Two speedboats will arrive and stop beside your boat, calmly aim for the head or the barrels to blow them up and get rid of the enemies quickly.
After these other enemies will arrive but this time they will get on your vehicle, you can hide behind objects by pressing O and shoot or follow the instructions of the keys to press to perform various combos. After this wave of pirates, stay hidden from the speedboat with the rocket launcher and wait for Sully to arrive.
Suggestion
This first chapter is the best place to face some challenges to get medals and trophies, in fact you can meet quite easily:
- Brawl (kill 5 enemies with a brutal combo, press Square, Triangle, Square to execute it)
- Violent Expert (kill 5 enemies in a row with a brutal combo)
- Breakneck (kill 5 enemies with one punch after weakening them with weapons)
- Expert Neck Breaker (Kill 5 enemies in a row with one punch after weakening them with weapons)
NB: in easy mode a gunshot will be enough while in normal and difficult it will take a couple, after which punch with Square.
- Expert Sniper (kill 5 enemies in a row with a headshot)
The simplest enemies are the first four that will remain on the boats, the fifth will be a bit difficult because you will have to shoot one of those who will get on your boat.
2- IN SEARCH OF EL DORADO
TREASURES: 6
Start moving along the stream, when you arrive in a narrow passage between the high rocks look on the ones on the left (view facing the point you came from) to notice a sparkle, approach and it will appear to press Triangle to recover the first treasure of the game, the silver earring with Inca mosaic.
Go past the waterfall until you get to a clearing where there will be a short cutscene, start moving again to get to the ruins. As soon as you enter, immediately go left and climb up the destroyed wall (you will see the writing to press X to go up), turn left and jump on the platforms to return to the place you came from; when you reach the second one, go up on the horizontal column and then jump on the vertical one in front, turn once again to the left and reach the last column to find the second treasure, the silver Monkey adorned with precious stones, at the foot of the tree.
Go back to the previous column and jump to the next one, from here reach the wall in front of you, press Circle to grab the ledge and move left until you reach the platform above the floor previously controlled by Sully, you will find here a carved boulder and push it (you will see the message to press Triangle) to reveal a passage. Enter the building and walk along the corridor, after the cutscene approach the precipice and look to your left, near the large column, to find the third treasure, the decorated Golden Ring, after which shoot the gunpowder barrel to create a way for you to continue.
Reach the end of the passage and repeatedly press Triangle to pull the chain and open the door: after a failed attempt Sully will take care of it, you pass the gate and approach the cart on the right, hold down Triangle to move it and block the passage in so that your partner can join you. Wait a short while and when told to check Drake's diary press Select to find out what to do. Once the brazier is lit, aim and shoot the lamp on the farthest ceiling to drop some embers and burn the wood that obstructs your way, enter the next room and go left to see some white blocks on the wall: use these to move, being careful to those who slip away (falling to the ground you will die), until you reach a root and go down to the floor, go to the right to find more barrels to blow up and free the ladder from the rubble. Wait for Sully to light the brazier and move further along the corridor until you reach the next room where there will be a small puzzle to solve: go down to the lower level and after a short dialogue you will have to take a look at Drake's diary to understand what to do.
There are four stones on the floor with a drawing, each drawing corresponds to the one reported in the diary and the numbers marked alongside indicate the order in which the switches located in the other, on platforms at the sides of the room, must be activated. The first switch to activate is the one furthest to the right (with respect to the corridor you came from), the second is the close one on the left, the third is the far one on the left and the fourth is the one close to the right. The floor will open, go down the ladder and when you reach the bottom move left on the rocky ledges, enter the room and push the cube towards the door to activate a mechanism that will fill the well. Now dive into the water and go to the right, go up to the dry area and check to the right of the large rock in the center of the clearing to find the fourth treasure, the Silver Blade, after which go to the opposite side to find some ledges using the which you can climb the wall.
Once on the platform at the top, move to the ledge and then the root to get to the next room, blow up the barrel to open a passage for Sully and walk down the corridor. Use the chain to open the gate, a wooden corridor will appear, take a few steps and you will have to start running because the structure will start to give way, get to the end where the place is safe and then go up the stairs once your partner is there. will have reached. After the cutscene take a look around the room to find the fifth treasure, the Inca Gold Cup, it is on the wall where there are skeletons, next to a jar (from the stairs you came from, look immediately to the left). Now follow the tracks that will lead you back to the open, as soon as you leave the temple go up the rock on the right to be able to climb the three columns lined up in the clearing, on the last of them you will find the sixth treasure, the Silver Turtle. Resume walking along the path and enjoy the film about your new discovery.
3 - AN UNEXPECTED DISCOVERY
TREASURES: 2
Dive into the water and swim towards the cascade, then go to the right to find land where you have to face a path (directed in the first part always to the left) composed of ledges and vines: the latter are used as a pendulum, press the lever in the direction in which Nathan is aimed at to increase the swing and when it is wide enough jump to grab onto the next rock. Immediately after reaching the handhold following the third vine, stay still for a moment and look up on the right of the screen to see a sparkle on a small clearing, here you will find the first treasure, the Tairona gold pendant; to reach it, simply move along the ledge until you turn the corner and find a couple upwards, grab the last one and move to the right.
Go back and continue to the left, after a message from Sully you will have to walk down a narrow corridor that will lead you to a dead end, press Circle to cling to the edge and then be able to reach the platform below, from here begins the second part of the path, directed to the right, very short, in fact all you have to do is jump on another couple of platforms and use some ledges to go down to the top of the submarine.
Reach the tip of the vehicle, on the opposite side in short, to find the second treasure of the level, the Inca gold and jade earring, after which enter the submarine through the turret and approach the hatch that you can open first by repeatedly pressing Triangle , then turning the left stick counterclockwise twice. Go down to the lower level where there will be a short cutscene and then resume moving to the end of the flooded corridor where you can go back to the upper level and see another cutscene. After this, resume walking down the corridor and then watch the next rather long video sequence.
As soon as you regain control of your character, start running along the path, you will have to eliminate an enemy with your bare hands and at the end of the passage you will find your acquaintance who will give you a gun. You will now have to re-enter the temple and do the reverse path from the previous level. Hide behind the column and shoot aiming at the head of the guard, three more will arrive immediately, eliminate them and enter the building, take the AK-47 from one of the enemies and eliminate all those who appear on the way. Arrived at the room with the well, be careful because as soon as you go up the stairs you will be immediately targeted by other men, take cover behind a wall and kill them, you can approach those in the distance by performing somersaults using the stone blocks in the middle of the corridor as a shield. When you get back outdoors, there will be three more guards left to take out; at this point you just have to get closer to the jeep.