10 Shards of Armor of the Abyss are scattered around the world of Darksiders, final equipment that will drastically reduce the damage taken. Some of them are easy to take, while others are well hidden, and although you sometimes see the chests, you may not be able to reach them as you will need a special power or object. One thing that will make your life much easier is the legendary Embrace of Fury upgrade (see the description below to find out the location): it will show the entire map of the various areas (even if you have not recovered the specific map) and also all the treasures present. Just equip it with any of the three weapons and that's it.
There is only one thing to point out: all the fragments can be taken safely whenever you want, except for one: the one found in Eden. This location, in which you will arrive towards the final part of the game, you will reach it in only one occasion, and, once you exit, you will not be able to return.
Location of the Embrace of Fury (Legendary upgrade)
In the eastern area of the Black Throne you will arrive at a point where you will have to throw a bomb through two portals to break some red crystals, and, following the same path, you will arrive in a room with three bats. Get rid of it and look to the top left to see a portal: activate it and go back to the corridor where you dropped the bomb, to create another one and reach the one you just made; you will find yourself in the upper part of the previous room. Press the button on the ground to build a passage and reach the chest on the opposite side.
Fiery Gallows (X2)
- Enter the building with the Vulgrim shop and approach the gap that gives the platform in the center of the lava lake. Perform a jump towards it, but before making the second in flight, and then before gliding, wait to fall a little, otherwise your flight will be short and you will end up in magma. Your destination is the corridor located at the base of the rock column that supports the platform, once you get there you just have to walk it all the way to find the casket.
- you will need the Cross Blade. Looking at the library from the open space where Samael is located, you will notice a red rock on the second floor of the destroyed building; throw the blade at the mine to make it explode and collapse a column that will allow you to reach the second floor and then the chest containing the fragment.
Twilight Cathedral (X1)
You will need the Crossed Blade. Go to the atrium north of the cathedral, the one shown on the map with a large circle (where the platform with the three statues will pop up once you give them the swords), and use the throwing weapon to make the monster hanging on top disappear. ceiling of the raised covered corridor, then take advantage of the moment it retreats to break through the door and open the chest at the end of the road.
The Drowned Pass (X2)
- You will automatically get an armor fragment once you have completed all four challenges and returned to the golem.
- you will find the chest in the same place where you will have to face the challenge, in the northernmost place of the map, in the north-east open space accessible via an underwater tunnel.
The cavities (X1)
Arrived in a long "serrated" corridor in the south area, immediately after making the acquaintance of a new type of enemy, you will have to face other similar ones, after which a giant one will emerge and break the wall: once the battle is over, go right into the hole opened by the monster to find the chest.
Ashen Lands (X1)
Open the map and look in the central area, where there are two large drills: go to the one further east, but go north with Ruin until you find a blue orb to enhance the flight. Use it to go up the road, follow it and use the Abyss Range on the orange holds to overcome the distance that separated you from another piece of path, advance a few steps and looking at the drill you will notice another grip. This time to reach it you will have to perform a double jump towards it and then quickly press R2 as soon as it appears on the screen; doing so you will land on the top of the drill with the chest.
Iron vault (X1)
In the eastern part of the central floor there is a room with a Chronosphere: looking up you will notice an orange grip on which to use the Abyssal Range, which will allow you to reach a room to the north containing the chest.
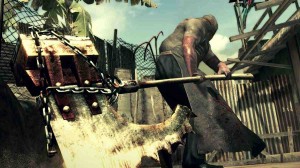
The Black Throne (X1)
Once the second ray is released, follow the path that will be created until you reach a room with the enigma of the portals on the two towers that move vertically, beyond which there is a spiral staircase that descends. At the bottom create a portal near you and one on the column that turns suspended in the void, as soon as you see the free passage enter to find yourself in an area with a bomb hanging on the wall in front of you: create a portal on your right (the the other will remain on the rotating column) and throw a bomb, taking it with the Chain of Abyss, over the gap you created as soon as you see the red crystals. Now wait for the column to turn again until you see a circle for portals appear, teleport at that moment and you will find the chest.
Eden (X1)
Warning: to be taken before using the Azrael portal!
Immediately after defeating your "shadow", use the mask to make the bridge appear in front of you and be able to continue, but, instead of taking the staircase, go right towards the waterfall: reach the waterfall to the northeast and look behind it to find the chest with the mask still active.