Guide Village missions 3 ★ di Monster Hunter Generations.
Here you will find the mission guide Village 1 ★
Here you will find the mission guide Village 2 ★
The missions will take place on the maps: Jurassic Frontier, Dunes, Green Hills, Arctic Mountain, Misty Peaks, Desert Island and Swamp (the latter two are new zones compared to the previous mission series).
Tour: Desert Island
Main Objective: Survive until expiration or deliver Paw Pass Coupon
Secondary objective: -
Time limit: 50 minutes
Map: Desert Island
This mission offers the hunter the opportunity to fully explore the Desert Island map, collecting and hunting everything. It is a good opportunity to get to know the map better.
Tours are useful missions for collecting materials. It is recommended to use the Palico because it does not get tired running and has infinite extraction objects, it also does not use objects so you can start the mission with an empty inventory (we also recommend a collector type companion).
When you are satisfied with the tour, go back to Area 1 and take the paw pass voucher from the blue box, hand it in the red box to finish.
NB: the paw pass voucher takes up a space in the inventory, so if you are full and don't want to give up anything you can send the items directly home from the NPC in Area 1.
Tour: Swamp
Main Objective: Survive until expiration or deliver Paw Pass Coupon
Secondary objective: -
Time limit: 50 minutes
Map: Swamp
This mission offers the hunter the opportunity to fully explore the Swamp map, collecting and hunting everything. It is a good opportunity to get to know the map better.
Tours are useful missions for collecting materials. It is recommended to use the Palico because it does not get tired running and has infinite extraction objects, it also does not use objects so you can start the mission with an empty inventory (we also recommend a collector type companion).
When you are satisfied with the tour, go back to Area 1 and take the paw pass voucher from the blue box, hand it in the red box to finish.
NB: the paw pass voucher takes up a space in the inventory, so if you are full and don't want to give up anything you can send the items directly home from the NPC in Area 1.
Troublesome fauna (key mission)
Main Objective: Hunt a Yian Kut-Ku (Reward 1800z)
Contract fee: 200z
Secondary Objective: Deliver 2 Ancient Berries (Reward 300z)
Big Monsters: Yian Kut-Ku
Time limit: 50 minutes
Map: Jurassic frontier
You will find the Yian Kut-Ku in Area 5. It is a clumsy and unpredictable creature, but from this comes its dangerousness. It will often compulsively charge you, rolling badly afterwards (offering a great damage window). Throw a Paint Ball to track its movements.
When you kill him the mission will automatically end.
Colpo di coda
Main Objective: Hunt 2 Great Maccao (Reward 1800z)
Contract fee: 200z
Secondary Objective: Deliver a Wyvern Tear (Reward 600z)
Large Monsters: Great Maccao x2
Time limit: 50 minutes
Map: Jurassic frontier
You will find one of the two Gran Maccaro in Area 5. Try to concentrate on only one Gran Maccao at a time (tag the one you are interested in from the touch screen to track its position, it will be useful if both Gran Maccao are in the same Area simultaneously).
Launch two paint balls to follow their movements.
When you kill them both the mission will automatically end.
Ancient treasure: Ediz. amphibian
Main Objective: Catch a Tetsucabra (Reward 3600z)
Contract fee: 400z
Secondary objective: -
Large monsters: Tetsucabra
Time limit: 50 minutes
Map: Jurassic frontier
Here is the first capture mission! These missions can be annoying at first, but later on you will find yourself preferring them and, moreover, using capture as often as you can.
Bring a supply of Sleep Bombs and Covered Traps with you (you will find a shaken Trap in the blue box of Area 1, but if it's your first time catching a monster will probably not be enough).
The Tetsucabra is in Area 3. Throw a paint ball at him to follow his movements around the map. Hit him as usual and at some point you will notice that he is getting tired (drool / change Area). This would be a good time for the more experienced hunters to catch the monster, you will have to place the trap and wait for it to pass over it to activate it, as soon as it activates it throw a couple of Sleep Bombs to capture it.
If this procedure is difficult, you can always wait for him to go to sleep to recover energy. The first zone change will do it towards Area 8, then in 9 to sleep. When he is asleep, put a trap on him and attack him, waking up he will be trapped and you can throw two Sleep Bombs at him.
As soon as he is captured, the mission will end. Keep in mind that you cannot retrieve items from his body (as the Tetsucabra is still alive).
Turn the fashion
Main Objective: Kill 20 Bnahabra (Reward 1200z)
Contract fee: 200z
Secondary objective: -
Big Monsters: Gypceros
Time limit: 50 minutes
Map: Jurassic frontier
These annoying flying insects can be found in Areas 1, 3, 7 and 10 (in the latter you will find many and you can also wait for them to return to the area). They are not easy to catch, especially if you have a heavy weapon, so better something faster that can reach good heights (like the Insect Glaive).
You can't get anything out of the bodies of these insects because they will disintegrate right away.
Once 20 Bnahabra have been killed, the mission will end.
Sprouts of the abyss (key mission)
Main Objective: Deliver 8 Abyssal Mushrooms (Reward 1200z)
Contract fee: 200z
Secondary objective: -
Large monsters: Great Maccao, Tetsucabra, Glavenus
Time limit: 50 minutes
Map: Jurassic frontier
Particular mission: you will find yourself in Area 11 (instead of the usual field in Area 1). Here you will be immediately spotted by a Glavenus. Escape immediately to a nearby Area (9 or 10), because the opponent is currently out of your reach.
Ready in a heartbeat
Main Objective: Deliver 3 Whalefish (Reward 1800z)
Contract fee: 200z
Secondary objective: -
Time limit: 50 minutes
Map: Jurassic frontier
Reach Area 3, get rid of the monsters present and concentrate on the body of water. If you do not find any lightning fish, leave the area and re-enter to "reset" the fish in the water.
Return 3 to the red box in Area 1 to finish the mission.
Giant lurking (key mission)
Main Objective: Hunt a Daimyo Hermitaur (Reward 2400z)
Contract fee: 300z
Secondary Objective: Kill 8 Hermitaurs (Reward 1200z)
Big monsters: Daimyo Hermitaur
Time limit: 50 minutes
Map: Dune
Bring a supply of Fresh Drinks. The Daimyo Hermitaur is an impressive monster that can be intimidating to many hunters. You'll find him in Area 3. He has an armor shaped like a menacing skull on his back, so don't attack from that side (focus on the front).
Throw him a paint ball to follow his movements. It will move to Areas 1, 2 and 7.
When you kill him the mission will automatically end.
The wolverine of the desert (key mission)
Main Objective: Hunt a Nibelsnarf (Reward 2700z)
Contract fee: 300z
Secondary Objective: Wound the legs of the Nibelsnarf (Reward 300z)
Large monsters: Nibelsnarf
Time limit: 50 minutes
Map: Dune
The Nibelsnarf resembles a whale. In the sand though. Bring a discover of fresh drinks and barrel bombs. You will find it in Area 7. In the blue box of the field in Area 1 there will already be a Big Barrel, but you should buy some from the shopkeeper first.
The monster will swallow the bombs and, once they have exploded, it will find itself lying on its stomach. Attack him right now. Throw him a paint ball to follow his movements.
When you kill him the mission will automatically end.
Konchu collector
Main Objective: Kill 15 Konchu (Reward 1200z)
Contract fee: 200z
Secondary Objective: Hunt a Cephadrome (Reward 1500z)
Big Monsters: Cephadrome
Time limit: 50 minutes
Map: Dune
Bring a supply of Fresh Drinks. Konchu are small armored insects that curl up on themselves to attack you. The first shot you give them they will fly away in ball form but land on their backs, this is the right time to attack them.
You'll find plenty of them in Areas 3, 4, 5, and 7. For the secondary objective, the Cephadrome moves to Areas 2 and 7.
When you kill 20 konchu the mission will automatically end.
Plague of the dunes
Main Objective: Kill 10 Hermitaurs or deliver Paw Pass Coupon (1500z Reward)
Contract fee: 200z
Secondary objective: -
Big Monsters: Cephadrome
Time limit: 50 minutes
Map: Dune
Bring a supply of Fresh Drinks. You will find these crab-like beings in Areas 2, 3, 7 and 9.
When you kill 10 them the mission will end automatically.
It takes guts!
Main Objective: Deliver 5 Apceros Livers (Reward 1200z)
Contract fee: 200z
Secondary Objective: Deliver 5 Royal Kabuto (900z Reward)
Big Monsters: Gendrome
Time limit: 50 minutes
Map: Dune
Bring a supply of Fresh Drinks. You will find the Apceros in Areas 4, 7 and 8 (watch out for the Velocidrome that may appear in Area 4). When you have killed them, take the livers from their body.
For the secondary objective, look for royal kabuto at insect collection points.
Deliver the materials in the red box of Area 1 to end the mission.
Cunning marauders
Main Objective: Kill 20 Velociprey (Reward 1800z)
Contract fee: 200z
Secondary Objective: Hunt a Velocidrome (Reward 900z)
Large Monsters: Velocidrome
Time limit: 50 minutes
Map: Green Hills
You will find Velocipreys in Areas 3, 4 and 10 (beware of the Velocidrome that may appear in Areas 2 and 3). It is also worth taking down the Velocidrome because, in addition to being the secondary objective of the mission, it will attract many Velociprey to itself.
When you kill 20, the mission will automatically end.
Everyone's crazy about mushrooms!
Main Objective: Deliver 10 Special Mushrooms (900z Reward)
Contract fee: 100z
Secondary Objective: Deliver 2 White Livers (Reward 300z)
Large Monsters: Velocidrome
Time limit: 50 minutes
Map: Green Hills
Simple collection mission. You will find the mushrooms in Areas 8, 7, 9, 3 and 10 (look for them in that order), while the white livers can be collected from the bodies of the Kelbi.
Watch out for the Velocidrome in Area 3.
Local threat
Main Objective: Hunt a Yian Kut-Ku (Reward 1800z)
Contract fee: 200z
Secondary Objective: Wound Yian Kut-Ku's head (Reward 300z)
Big Monsters: Yian Kut-Ku
Time limit: 50 minutes
Map: Green Hills
You will find the Yian Kut-Ku in Area 3. Throw a paint ball at him to follow his movements. It will go to Areas 2, 4 and 5.
Once killed the mission will end automatically.
In the wyvern's lair
Main Objective: Deliver 2 Wyvern Eggs (Reward 2400z)
Contract fee: 300z
Secondary objective: -
Large monsters: Yian Kut-Ku, Velocidrome, Astalos
Time limit: 50 minutes
Map: Green Hills
Considering the problems of the egg collection missions (and since in this mission you will have to collect as many as 2, with an Astalos chasing you), we recommend taking a look at this accelerated guide.
You can avoid killing the Astalos, only it will haunt you throughout the map and risk dropping the egg.
Mixed snow Lagombi
Main Objective: Hunt a Lagombi (Reward 1800z)
Contract fee: 200z
Secondary Objective: Wound the Lagombi's head (Reward 300z)
Big monsters: Lagombi
Time limit: 50 minutes
Map: Monte Arcico
Bring a supply of Hot Drinks. This giant snow rabbit is located in Area 8, but will move to Areas 6, 7 and 8.
Throw him a paint ball to follow his movements. The Lagombi can be very fast, particularly when it starts charging. Avoid his 2 or 3 consecutive charges and wait when he stands up on his legs, because he will roll on you and crush you (particularly if you are behind him).
Once killed the mission will end automatically.
Anteka perfume
Main Objective: Kill 8 Anteka (Reward 900z)
Contract fee: 100z
Secondary Objective: Deliver a Khezu Larva (Reward 600z)
Big monsters: Lagombi
Time limit: 50 minutes
Map: Monte Arcico
Bring a supply of Hot Drinks. You will find the Anteka in Areas 1, 5, 6 and 8. Beware of the Lagombi in Areas 6, 7 and 8.
For the secondary objective, you will find the Khezu larva in Area 8, in a stone collection spot. However, this larva will have to be transported by hand to the field of Area 1.
When you kill 8 Antekas the mission will end automatically.
The shadow in the mountains
Main Objective: Hunt a Khezu (Reward 2700z)
Contract fee: 300z
Secondary Objective: Ride & Overthrow Monster x2 (Reward 300z)
Large monsters: Khezu
Time limit: 50 minutes
Map: Monte Arcico
Bring a supply of Hot Drinks. The Khezu is found in Area 8. This terrifying gray worm with a long neck and a toothed mouth is a formidable opponent. It can throw lightning and stun you. Throw him a paint ball to follow his movements. It will go to Areas 1, 3, 6 and 7.
Using a ranged weapon could help a lot, considering the Khezu is quite slow.
When you finally kill him the mission will automatically end.
Deep recall
Main Objective: Deliver 3 Tongues of Popo (900z Reward)
Contract fee: 100z
Secondary objective: -
Large monsters: Lagombi, Khezu, Gammoth
Time limit: 50 minutes
Map: Monte Arcico
Bring a supply of Hot Drinks. Popos are usually found in Area 1, but this time they're not there. Go to Area 6 and you will find a nice Gammoth waiting for you. Don't deal with him, rather run away and wait for him to change zones, then return to Area 6 for the Popos. If you don't find all the languages you need from their bodies, exit the Area and re-enter after a while.
It may be useful to throw a paint ball at the Gammoth to control where it moves and stay away from it.
Mud on the Bullfango
Main Objective: Kill 20 Bullfango (Reward 2100z)
Contract fee: 300z
Secondary Objective: Hunt a Bulldrome (Reward 1200z)
Big Monsters: Bulldrome
Time limit: 50 minutes
Map: Misty Peaks
The Bullfangos can be found in Areas 2, 4, 6 and 9. For the secondary objective, the Bulldrome is located in Area 4.
When you kill 20 Bullfango the mission will automatically end.
Yolk in the evening ...
Main Objective: Deliver 3 Gargwa Eggs (Reward 1800z)
Contract fee: 200z
Secondary Objective: Deliver 3 Gargwa Guano (Reward 300z)
Big monsters: Arzuros
Time limit: 50 minutes
Map: Misty Peaks
The Gargwa are located in Areas 1, 4 and 7. Hit one and, if you are lucky, it will drop an egg (which you must return to the red box of the Base Camp Area 1).
Watch out for the Arzuros in Area 5. If there are no more Gargwa around, change the area and come back in waiting a few minutes.
SOS
Main Objective: Hunt a Royal Ludroth (Reward 2400z)
Contract fee: 300z
Secondary Objective: Deliver a Wyvern Tear (Reward 600z)
Big Monsters: Royal Ludroth
Time limit: 50 minutes
Map: Misty Peaks
The royal Ludroth is a kind of lizard / lion that you will find in Area 7. Be careful when shaking his mane, be prepared for his attack. When he gets tired he can charge you from afar while throwing bubbles of water (even more than once in a row).
Throw a paint ball at him to follow his movements.
When you kill him the mission will automatically end.
Brawl in the woods
Main Objective: Hunt a Bulldrome (Reward 1200z)
Contract fee: 200z
Secondary objective: -
Large monsters: Bulldrome, Mizutsune
Time limit: 50 minutes
Map: Misty Peaks
Look for a simple Bulldrome and you find yourself fighting a Mizutsune, precisely in Area 5. Avoid it without compliments and keep looking for the dear Bulldrome which is lost in Area 7 (or 4, if you don't find it before).
When you kill him the mission will automatically end.
Royal Honey Hunt
Main Objective: Deliver 5 Royal Honeys (900z Reward)
Contract fee: 100z
Secondary Objective: Hunt an Arzuros (Reward 1200z)
Big monsters: Arzuros
Time limit: 50 minutes
Map: Misty Peaks
In Area 5 there is a commercial for royal honey, but there is also an Arzuros. Kill him if you intend to complete the secondary objective, otherwise let the Companions keep him busy and recover the royal honey.
Another honey collection point is located in Area 9.
Soaking wet (key mission)
Prerequisites: [Village 3 ★] Sprouts of the Abyss
Main Objective: Hunt a Royal Ludroth (Reward 2400z)
Contract fee: 300z
Secondary Objective: Kill 8 Ludroth (Reward 1200z)
Big Monsters: Royal Ludroth
Time limit: 50 minutes
Map: Desert Island
Another royal Ludroth to hunt (as per the SOS mission found on this page).
You will find this in Area 7. Throw a paint ball at him to follow his movements. It will go to Areas 2, 5, 6 and 9.
NB: after the first move to Area 2 the monster will be drinking. It is the best attack window that could happen to you.
When you kill him the mission will automatically end.
Pink crabs
Main Objective: Catch a Daimyo Hermitaur (Reward 3600z)
Contract fee: 400z
Secondary Objective: Break D. Hermitaur's Claw (Reward 300z)
Big monsters: Daimyo Hermitaur
Time limit: 50 minutes
Map: Desert Island
New mission catches us! This time of a Daimyo Hermitaur. You will find him in Area 5, he will move to Areas 2, 6 and 7, however throw him a paint ball to follow him.
For a guide to capture, refer to the Ancient Treasure mission: Edit. amphibian you find on this page.
A bunch of troubles
Main Objective: Kill 20 Jaggi or Jaggia in total (Reward 1800z)
Contract fee: 200z
Secondary objective: -
Big monsters: Daimyo Hermitaur
Time limit: 50 minutes
Map: Desert Island
Jaggi and Jaggia are found in abundance in Areas 2, 5 and 6. You will have to wait until they return to Areas to kill 20. Beware of the Daimyo Hermitaur in Areas 5 and 6.
When you have killed 20, the mission will automatically end.
Mushroom of my desires
Main Objective: Deliver 5 Ripe Mushrooms (Reward 1200z)
Contract fee: 200z
Secondary Objective: Deliver 10 Special Mushrooms (Reward 600z)
Big monsters: Arzuros
Time limit: 50 minutes
Map: Desert Island
Wait for the Altaroth bugs in Areas 2 and 3 to eat the mushrooms (their stomach will swell) and then attack them. They will drop a bright object, a ripe mushroom.
Better to wait until ALL the insects have eaten because if you attack them one at a time the Companions will also attack the other insects that have not yet eaten and you will have to wait for them to return to the area.
Special mushrooms for the secondary objective can be found in all mushroom picking spots (but don't pick them from Altaroth Areas or they won't have anything to eat).
Beware of an Arzuros in Area 3.
Moofah balls
Main Objective: Deliver 5 Furs of Moofah (Reward 900z)
Contract fee: 100z
Secondary objective: -
Time limit: 50 minutes
Map: Desert Island
Moofahs are similar to sheep. You'll find them comfortably in Area 2. Hit them and they'll drop their furs (which you can also find from their bodies). Wait for them to return to the zone and start over until you have 5.
Points on the desert island
Main Objective: Get 1000 Wycademy Points (Reward 2100z)
Contract fee: 300z
Secondary Objective: Hunt a Tetsucabra (Reward 2400z)
Large monsters: Tetsucabra
Time limit: 50 minutes
Map: Desert Island
To accumulate points you need special objects that you can find both by collecting from collection points and by killing monsters.
You will find a 1000 point Wyvern Egg in Area 8, return to Base Camp via Areas 7 and 3. For the secondary objective, you will find the Tetsucabra in Area 7.
Rescue on the island!
Main Objective: Hunt an Iodrome (Reward 1800z)
Contract fee: 200z
Secondary Objective: Kill 12 Ioprey (Reward 1200z)
Big Monsters: Iodrome
Time limit: 50 minutes
Map: Swamp
Bring a supply of Antidotes. This poisonous mix of a velociraptor, a Grand Maccao, and a Gendrome is located in Area 6. Dodge the poisonous purple substance that spits on you. Throw him a paint ball to follow his movements.
It will move to Areas 8 and 4.
When you kill him the mission will automatically end.
Shiny booty (key mission)
Prerequisites: [Village 3 ★] Sprouts of the Abyss
Main Objective: Hunt a Gypceros (Reward 2100z)
Contract fee: 300z
Secondary Objective: Wound the crest of the Gypceros (Reward 300z)
Big Monsters: Gypceros
Time limit: 50 minutes
Map: Swamp
Bring a supply of Antidotes. The Gypceros is a creature similar to the Yian Kut-Ku. You will find him in Area 8. Be careful because he can easily stun you thanks to his horn. You will understand when he is going to stun you because his horn will start to emit flashes (and you will hear a particular noise).
Also beware of its poison, because the Gypceros will charge you spitting it out. The peculiarity of this monster is that it will pretend to be dead when you have tired it enough. Throw a paint ball at him to follow his movements.
It will move to Areas 6 and 4.
When you kill him the mission will automatically end.
Neopteron concert
Main Objective: Kill 20 Vespoid or Hornetaur in total (Reward 1200z)
Contract fee: 200z
Secondary objective: -
Big Monsters: Gypceros
Time limit: 50 minutes
Map: Swamp
The Swamp is full of insects (flying and crawling). You will have to kill at least 20 to finish the mission. You will find all kinds of them in Areas 2, 4, 5, 6 and 8.
Watch out for the Gypceros in Area 4 or 6.
Vacation to scream
Main Objective: Kill 10 Ioprey (Reward 1200z)
Contract fee: 200z
Secondary Objective: Hunt an Iodrome (Reward 1800z)
Big Monsters: Iodrome
Time limit: 50 minutes
Map: Swamp
Bring a supply of Antidotes. Iopreys are, as the name suggests, small Iodromes, with obviously less life and less poison. You will find many in Areas 5 and 8. In Area 8 you will probably also find the Iodrome if you want to complete the secondary objective.
Once 10 Iopreys have been killed, the mission will automatically end.
Real kabuto out of control
Main Objective: Deliver 10 Royal Kabuto (Reward 1800z)
Contract fee: 200z
Secondary Objective: Deliver 5 Aurstone Pieces (Reward 1200z)
Big Monsters: Bulldrome
Time limit: 50 minutes
Map: Swamp
Bring some Mega-nets. In Area 1 there are many insect collection points, where you will find enough real kabuto to finish the mission easily.
For the secondary objective, however, you will have to search the map for stone collection points.
Points in the swamp
Main Objective: Get 1000 Wycademy Points (Reward 2100z)
Contract fee: 300z
Secondary Objective: Hunt a Yian Kut-Ku (Reward 1800z)
Big Monsters: Yian Kut-Ku
Time limit: 50 minutes
Map: Swamp
The Sootstone is worth 800 points and you will find it on a crystal wall in Area 9. You will have to carry it by hand to base camp (through Areas 3 and 2), so before digging, score more points from the stone collection spots nearby (Goldstone Pieces are worth 200 points each).
For the secondary objective, you will find the Yian Kut-Ku in Areas 4 or 8.
Once all the key missions have been completed, the urgent mission will be unlocked, completing which you will have access to the 4-star Village missions.
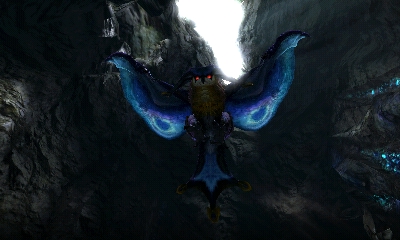
The Night Charmer - URGENT
Main Objective: Hunt a Malfestio (Reward 3000z)
Contract fee: 300z
Secondary Objective: Wound Malfestio's head (Reward 600z)
Big monsters: Malfestio
Time limit: 50 minutes
Map: Jurassic frontier
You will find this monster (similar to a huge yellow and blue owl) in Area 4. Throw a paint ball at it to follow its movements on the map (it will move to Areas 7 and 8).
Beware of its blue beam that can put you to sleep and a yellow area attack that can stun you. So take some energy drinks with you to counter sleep.
During the blue ray it can be easily attacked, as it remains motionless. The Airplane style is very useful as you can easily get on the back of the Malfestio.
Here a clash with the monster:
https://www.youtube.com/watch?v=NAAXdnDT9Y8
Once the Malfestio is killed the mission will end automatically, remember to retrieve all the available objects from his body.