This guide will try to help you throughout the Rogue Galaxy adventure by indicating the places for all the hidden treasures and warning you about the enemies you will encounter on your way; avoiding blatant spoilers and citing only those closely related to the plot. It is therefore recommended to avoid reading it except during the game or after having already finished this in order to be able to restart it and have a more precise picture of the situation.
Chapter 1 - The beginning
Watch the opening scene, quite long, which will introduce, in addition to the two robots, the protagonist of Rogue Galaxy, Jaster. Immediately after you will notice that the city of Rosa, the planet you are on, is under siege: you will exit the church to face your first battle supported by a man who will result with the name of Hooded. You will be given the first commands to learn and the details on the charged bar which, once emptied, denies you the attack. After defeating the Baphu who surrounded you with great ease, you will receive your experience, a booty, and you will be invited by the hooded man to follow the greater beast. As soon as you have the opportunity to move, go to the church, the southernmost door of the map, inside which, on the left, you will find a chest with three healing potions. Exit this and go to the top left to find another chest with two well hidden Snow Crystals near the church walls. You can of course continue to encounter monsters, including Baphu and Mish, but nothing too difficult. Go to the red circle marked on the map for information on the Warp and your save point. After the bridge it will be easier to meet Dragonflies, to be killed with blows in the air; go left at the first fork and at the bottom you will find two chests, one contains 3 healing potions and the other cannot be opened without the star key. Now go back to the previous fork and go to the right, you will find nearby a house with which you can interact, a chest with a Thundering Stone inside, which you can use to learn the Sword of Light skill in the Eureka menu of Jaster: it will be explained quickly however in the game like all other things. Now enter the house and on the left you will find another closed chest that can only be opened with a specific key: go upstairs and go beyond the ladder behind the girl to find, in a chest, a regenerating Fluid. Continue along the only available road and swim over the bridge in the river: go up the ruins and collect on the left the two fire extinguishers and the 3 healing potions in the two chests, save the game and continue. After receiving the instructions on the skills, which you should have unlocked already with the Thundering Stone, enter the house on the right, go upstairs using the stairs, as we did before, and collect a holy water from the chest: avoid the another casket because it is another one that is impossible to open now. Continue on your way and you will see a cutscene, at the end of which you will get the Sword of the Seven Stars, the Desert Blade from the hooded man, as well as the Battle Recorder. A battle against two bosses will immediately begin:
| Giant x2 |
| The two giants must be hit in the air, in the head precisely, then jump and hit using the new sword and above all the sword of light ability: do not use the gun because it will not be of much use at this juncture. Hit one giant at a time until it falls to the ground: remember that you will be alone during this battle, so do not delay too much and watch your energy often. At the end of the battle, you will receive 30 experience points and 4 healing potions, in addition to the obvious spoils of war. |
After the battle, Simon and Steve, the two robots you saw at the beginning of the game, will join your group: you cannot change equipment or anything other than try to teach them some skills, if you have the necessary items, so continue without problems after reading the game hints. Continue on the only available road, in the house on the left there is nothing important so go directly to the save point. Save and enter the house opposite where you will find the first adventure shop: open the chest on the right to find 2 healing potions. After shopping at the store, which will be very poor, since the weapons offered are already in your possession, continue to find a silver bracelet in a basket. You will then be introduced to the attack on the highly defended sand turtles, often accompanied by cacti. Continuing, avoiding entering the next empty house, jump on the gray crates to get past the collapsed ruins and, just before the save point, open the chest to find a Regenerating Fluid. Save and go through the gate for another scene and another boss.
| Salamander Mark VIII |
| You will finally find yourself facing your first objective of the actual game: Simon and Steve won't be of much help, the less their skills will be. You will have to start by destroying the metal collars, which the Salamander carries on all fours, and once done you will be given the opportunity to climb on their back thanks to a weapon that Steve will give you: this is the monographic gun that allows you to create platforms. temporary. Equip it and, if the platforms created automatically during the cutscene disappear, create others; Climb onto the enemy's back and start hitting the heart. It should fall at your feet in a few strokes. Once the vital organ of the enemy has been destroyed, you will be told by Simon to start hitting the core in the head, so concentrate on its muzzle which will often start to breathe fire, so be careful not to die from being burned: reload often and use the Sword of Light to facilitate the task. From the destruction of the heart on you will be alone in the fight. At the end of the battle, you will receive a Tri-Heal and a Rebirth, in addition to the obvious experience. |
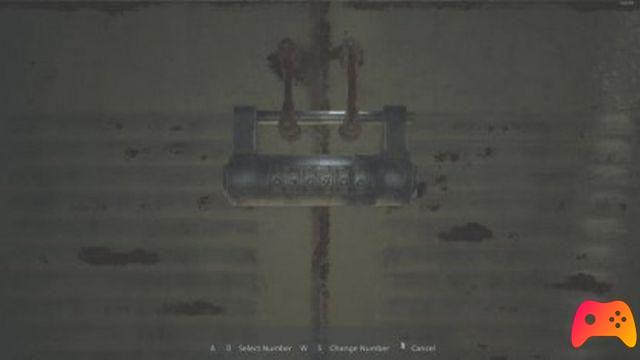
You will witness another scene in which Simon and Steve will leave you alone in the town: you will have a lot of time to shop. First of all, however, go to the warp, to save and exchange points, and notice that your position as a hunter has improved. Go near the door with the yellow star and on the left you will find a chest with a trap. Defuse the explosive and then open the chest to find an Izerio, if you open it directly your HP will drop to 1. Now go to the warp and use the teleport to get to the church area: immediately on the left you will find a chest with a delicate pendant , then, near the church, on the far left, you will find another casket, with a trap, with a nebulizer inside; finally near the walls of the church you will find 2 Rinascita. Enter the building to watch a video in which you will communicate the outcome to Raul. Go back to the residential area where you might find some new monsters called the Golden Child; As I doubt you will want to exchange your weapon for others, rent a Yago for 200 zehn and continue your adventure in the western desert. You will witness a scene again with Raul. You have thus completed the prologue of your adventure.
Chapter 2 - The Juraika Jungle Planet
You will find yourself on Dorgenark and, after the animated scenes, save the game with the warp; talk to Steve and go to the bridge for another scene with Kisala, the girl who saved you earlier in the desert, looking at the Pink Nebula. You will be attacked by some monsters that shouldn't cause too much trouble except for the fact that they are fast and often fly: hit them with the gun to make them go down on the bridge and wound them with the sword of light. Once the battle is over you will be forced to land on Juraika and start a journey with Kisala and Zegram. Before entering the jungle, check the Eureka screen to develop new skills. Use the landing gondola as soon as you are ready: save on the warp and move on. You will find, next to the man who acts as the shop, a chest with a Graverosse, to equip Jaster. Talk to the shopkeeper to find some necessary items in the Eureka menu and a Fire Rifle that you can buy or not. It has more power than the Graverosse but lacks in all features: given the price it is recommended to continue with the weaker weapon. The road is simple and one-way, you will see a movie in which Zegram invites you to go further into the forest, and at the first meeting with the Queen Bees, the altered statuses will also be introduced through a convenient table. Continuing you will find 4 Sanchez fruits in a tight curve and on the road you will find new monsters such as the Horrorwood, the Blue Thunder and the Smile, a strange enemy that before being defeated will force you to jump on his head. In the next chest you will find the Thundering Shurikens for Zegram, which not only increase the strength of the thunder but have a power of 59 against the 29 value of the normal Shurikens, so they are absolutely to equip. Continue on for a new cutscene that will show you the local population: go north and save at the warp on the river bank and, instead of continuing north, go explore the jungle. You will find yourself along the river through various roads that you can take: going left you will soon find yourself at a crossroads that to the south leads to another save point, you may meet some Gorillas to defeat, continuing you will find a house with a chest that you cannot open now. Go back to the save point and continue to the far left into a dead end to find a Myriad Branch in a chest. Take the road in reverse and go to the right of the main road to find a chest, which has a Mimic inside it: it is a tough monster to defeat at long range, if possible, and that can create a lot of problems with a single hit. On the left you will find a small road that takes you away from the river, following it you will enter an oasis with a waterfall at the bottom and two chests on the sides: on the left you will find the Powder of Dreams while the casket on the right is a Mimico, and the same recommendations made are valid. for the one encountered shortly before. Go back and continue along the main road, the one in front of the warp, to activate a Challenge and receive information regarding this event. Continue to find a large door that avoids the entrance: go back and use the teleporter to go to Filio's house. You will meet this strange being who will explain what happens to his village, after which he will give you a Powerful Glove to move the door: go back there. After opening it go ahead to find two chests, the first contains a Delicate Pendant, the other 3 Rebirths: the Stump is the most common enemy to find in this area. Continuing there will be a river to overcome, go to save at the warp, but then go back, following the south bank, to find a chest with a silver bracelet and a shopkeeper: avoid the Stone Breaker, which only adds one value to the power but it loses a lot in features, instead buy the Intersecters in Kisala, the waning Mezzaula in Zegram and avoid the Shuriken DX, as you have found more powerful ones on your way here. The chest in front of you is a Mimic, so be careful. Follow this road to get to the village and don't worry about the one that led to the north yet because it is closed. There is another chest ahead which contains a little bell. In the meantime you should have found a Scroll from some enemies, which you can use in the Eureka menu. Teach the Flame Strike to Jaster to have an easy time against the next enemies; to make it go well you will have to press the buttons marked when they go to position themselves in the square placed on the screen. You will find a save point just before the village and a cutscene will start: remember to check every now and then if you have any points to record via your Battle Log. You will get a bomb from Darius and a message to take to the village. The bomb is the object you need to clear the passage to the village, open the chest in front of Dario's house to get a Sting and then use the warp to return to the river bank and go north, reached the boulder use the bomb to shatter it. Follow the only road and along the way you will first find a chest with 3 Healing Potions and then a four-way intersection: start with the one on the right to find a warp and three baskets, the first two contain two blessed waters and a milk of Yago , the other is closed and cannot be opened yet; go to the left one now, to find two baskets. In the one on the left there is Grog, in the one on the right there is a Mimico. Now that you have explored the whole area, continue towards the north area and the first chest you will encounter will be another Mimic. The second chest will contain two Eternal Fires and, after a few steps, a cinematic will start in which a child and the Insectron will be presented. Once in the village, a little further on, they will block your way and force you to go back: your objective will now be the source to the right of the four-way intersection you met shortly before; then follow the yellow star and get there.
| Muddy scream |
| Your opponent attacks in three different ways: he starts with an electric discharge in the water, you will understand when he is about to do it by looking at his antennas that approach and then go wild; it attacks with the tongue, if you are too close to it, and finally it jumps here and there like a real frog, falling on your head and causing you a lot of damage. Lilika has a powerful attack, both if you load the bow to the maximum, or if you hit with her swords; Jaster's Desert Wind ability can be very useful. It would be better to fight this monster from a distance, since its electric attack will take you wherever you are in the water: so set the team strategy to “Stay behind” and as soon as the battle begins, go to the mainland; after which you start using one character at a time, changing them often. Remember that with Jaster you can use the Wind of the Desert, with Lilika the bow and when Mud Scream approaches also the attack with the daggers, while with Zegram you often use the Shuriken and when you want to attack him closely, activate the Burning Sword ability, if you have already unlocked it. It has a lot of HP and is very durable, but with a little calm it will fall at your feet. 110 experience points, a healing potion to a stone breaker will be your war booty, in addition to zehn money. |
A video will follow, then walk to the lake exit and you will meet CraCra, a strange frog, who will join the group: you will become aware of the fusion between weapons and you will get a Crusher. You can start to fuse all the weapons you want, paying attention to the CraCra rules: first you could merge the Graverosse you had equipped with the Sungrosse you had at the beginning of the game to give birth to a Power 64 Forearm. Continue to the village and save on the warp, enter the house on the right to find the chest on the ground floor of the Powder of Dreams and the upper floor of the Ripe Bananas. On the left you will find 3 coffee beans in the enclosure, in the adjacent house instead, upstairs, you will find earrings. Climb the stairs nearby to find 3 tonics at the end of a long climb. Continue to the merchant's shop and you will find another staircase that will lead you to an Ancient Scroll; then go to the shop to buy some new weapons: there is the Lucent Horn for Jaster which appears to have a greater power than the Crusher, but it lacks in the main features, so the decision is yours; then buy the Whirlpools and purple Stars for Kisala, the Iron Demon for Zegram and the Earth Bow for Lilika, who is not in your team, but if the item is for sale there will be a reason. The choice is yours to buy the omega stars for CraCra. Continue towards the village chief's house which is at the back and is easy to recognize because there are two guards at the entrance. A long scene will start at the end of which you have to follow the yellow star to get to Miri's house. When the other scene is over, you will find yourself on the path to the altar.
Chapter 3 - The God of the Stars
You will have to follow Miri and Lilika to prevent the sacrifice from happening: therefore go down to the left and, at the first intersection, go south along the river: you will arrive at Sherio's house, another recluse outside the village. Near his home you can find 2 Myriad Branches and 1 Ruby. Back at the intersection you can go left, to find a warp to activate, and a merchant who sells nothing interesting except some items that you might need in the Eureka menu. At this point the only road you have left is the one that leads north, now also marked with a yellow star, so your next goal. Once you arrive at the marked place you will find a destroyed ship and you will get a damaged Freeze Gun: there are two chests then in the area, one contains a Magic Lipstick and the other 4 Hoho feathers. You will have to go back to Sherio's house now that you have obtained the gun: he will fix it and an animated scene will follow. Now you will have to continue on your way, then teleport to the waterfall and start swimming until you find a question mark on a platform: you will have to cool the waterfall with the freezing gun and then use the holographic gun to create platforms to use to climb. the now frozen mountain. Halfway you will find a hemp suit that you can equip in Jaster: continuing you will find, when you are back on the plains near the river, a chest with a snow crystal on the right bank. Keep swimming in the river and then, when the falls block your way, go up to the right bank to watch a cutscene: you will lose Zegram for a while. Continuing you will find a warp and immediately afterwards a cutscene will start for reaching your goal.
| Arachnis |
| You will start the fight with Jaster and Kisala while Lilika will be watching: equip Jaster with the freezing gun and shoot your opponent. The gun will fire one shot at a time but it is very effective and you will only need it to block your opponent. Once stopped, start hitting him and when he has lost some energy, a cutscene will start after which Lilika will start fighting with you. Continue with the same strategy, paying attention to the monsters that Arachnis will release at full speed. If you have it unlocked use the Illusion Sword ability to hit from all distances and for a double strike, if you are close, it turns out to be the winning weapon. A Tricura and 2 Rebirths, plus 260 experience points will be given to you at the end of the battle. |
A video will follow in which the exile of Lilika will be announced who at this point, as the only possible way, will follow you on your journey as a permanent member. Zegram will return to your group with the Propellant that was needed to depart and leave Juraika.