Scratches is a classic graphic adventure that presents many objects to observe, not all obviously linked to the main story line that will then lead us to the epilogue. Obviously not all will be listed in the solution below but it is advisable to pay attention to every little detail to be able to enjoy this splendid and scary title to the fullest.
Saturday October 12
As soon as you arrive at the villa, turn to the car and enter it, honk the horn if you want and then open the dashboard to get the car key, insert it into the ignition slot, then get out of the vehicle. Observe the car engine and then head to the gate to attempt to open it without success. Open the mailbox and you will see that it is empty. Then go back to the position where you started the game and head forward and then turn right. You will see a large shed, probably a shed for tools of various kinds, which will however be closed by a large padlock. Go back and look at the villa in front of you to enjoy this glimpse of the game that should not be lost for any reason. At the bottom right, a little hidden in the bushes, you will notice a small window overlooking a dark environment: examine it. Go in front of the door and look at the two lights on the right and left, then open the door with the special key you have in your inventory. As soon as you enter, answer the phone that is ringing: you will find it on the table near the entrance. On the other side of the phone will be Jerry, your friend who took care of the house purchase. After listening to the conversation it will be time to look around the house for a while. Go to the first room to the right of the entrance and read the disturbing book that you will find on the table near the fireplace that tells of disturbing voices and presence inside the house. Look at the fireplace with the wood and the wall and then open the door located in this section of the house to access the study. Pay attention to the table on the left and pass the pointer over the cigars, then try to open the drawer but to no avail. You will find a large bookcase in front of you: in addition to the various volumes there, you will find a manuscript dedicated to Myst and one to the Necromicon among a pile of books. Now go to the large wooden desk you see in the eastern part of the room and read the book about an indigenous population dedicated to human sacrifices and crude and rudimentary rituals. Then open all the drawers and you will come into possession of an awl and an empty envelope. Only one drawer will be locked but you can open it during an advanced stage of the game.
Exit this environment to head towards the large door in front of you, remembering to try to turn on the light before leaving. The light, like any other self-respecting game of this genre, is inexplicably missing.
You will arrive in the dining room: a decadent environment that seems to have been completely torn apart by the passage of time with its oppressive and gloomy atmospheres.
Very suggestive as an environment, but rather useless as a plot, consider it more a passage point than a main area. Look at the paintings if you like and open the cupboard containing the spirits. Also look inside the dresser to find only unused napkins. Exit the door on the right (the one on the left will take you back to the room where you answered the phone). You will arrive in a corridor where you will have to interact with the table drawer and light the vases by moving the window curtain to the left. Now open the door and go to the kitchen.
As soon as you arrive, on the right, take a look at the wooden base used to hang the keys and the cabinet below and then go to the pantry. In the first section of furniture on the left, open the doors of the built-in cabinet and then rummage through the drawers for a butcher knife. Then go to the nearby block to try to open the taps but there will also be no water. There will be a small grinder on the kitchen table which will not help you now. Try to open the cellar door, the one closest to the shelves with the jars; you will need a key.
After that, enter the door to the left of the cellar. You will find yourself in the servants' room. The first thing to look at is the bed and bedside table nearby. Open the drawers to discover that the room had belonged to a photography enthusiast who worked as a maid in this villa many years before. Open the book and look at the hidden photograph where the key support base is immortalized with the cellar key hanging. Below it is a striped vase. First thought: the key has fallen into the vase and the latter must be found. Exact. Open the drawers of the big piece of furniture near the bed and then pick up a sheet with strange marks and a pencil on the desk. Use the pencil on the written page to find out that it is a letter written in French: you will need it during the game. Now enter the next room, a small bathroom that served as a rather precarious and messy photographic laboratory. Look at all the photos hanging plus the one that fell into the tub. In the photo of the fountain, you notice that there appears to be something glistening in the water.
Now go back to the entrance of the house.
Go up the long flight of stairs and enter the first door on the right. It will be your bedroom. Place the first suitcase on the cabinet at the bottom left and the second on the desk to take out the typewriter and the papers. In the suitcase containing your personal effects, take the pen and read the back of the book (Darkfall will come to mind for the most experienced adventurers), add the matches to the inventory and read the number of barbara, your secretary, on the notebook, also read Jerry's letter and by looking at his business card you will have his phone number. Open your desk drawers and read everything, then look in the trash can and immerse yourself in reading about somewhat disturbing past experiences. Near the bed, open the medical bag, rummage through the various objects and pick up the stethoscope. A quick look at the fireplace and then, since it's too early to go to bed, it's time to start wandering around your house again.
Exit the room and continue along the corridor to then enter the first door on the right: you will find yourself in an African museum, a place completely dissonant with the environment to which Scratches had accustomed us, which makes it even more fascinating.
Immediately notice the bust with the necklace hanging from the neck to your right and the various tapestries on the wall. Observe all the masks and vases in the window and then go to the table which is to the left of the entrance. Read the paper and look at the other objects. Then take a look at the large wooden structure containing two elephant tusks; first try to move it, then take a closer look at the part below to see a wooden panel that can be removed. Take the butcher's knife and you will discover wheels. Now leave the room, remembering this detail, however, because it will be essential for the game to play. Enter the front door and you will be in a bedroom. Examine the first painting you see on the right, near the bedside table with the mirror and you will see depicted a woman looking at a glass sphere. Click on the object to discover a secret safe that you will not be able to open, but it will be good to try anyway. Now interact with the mirror on the bedside table and turn to the other side of the bed and start opening the drawers: in the last one you will find an assortment of clothes: click on the plate of the central one to discover a little hint of humor from the developers.
Exit the room and continue along the corridor until you reach the two opposite flights of stairs: on the left you will return to the ground floor, on the right you will go up to the top floor while entering the room opposite you will find another bathroom. Open all the drawers and examine the sink but you can only add an old rag to your inventory. Now it's time to go up to the top floor.
After that, go out and go up the stairs nearby to get to the second floor. You will find yourself in a room with 3 doors and another staircase that seems to lead to the attic. On the left is a closed door; continue and enter the door on the left. There appears to be only bricks in the room, but if you click on the bottom right of the screen you will find a metal bar in one of them. Once you have collected this item, enter the adjoining room.
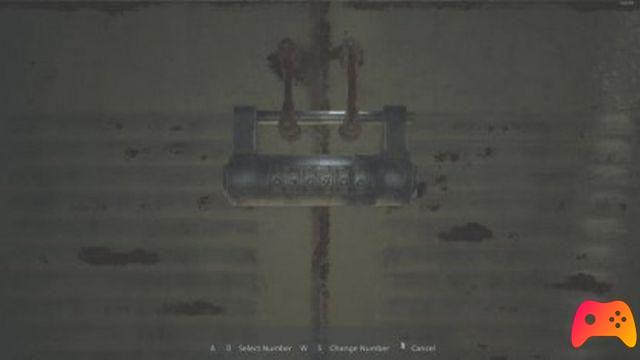
The second room is full of apparently useful items but the only thing worth dwelling on is the stove on top of the wooden planks used during the construction of the room. There will be a metal bar that acts as a support structure for some container. Use the bar you just found to mount it to the rest of the stove, done that, exit the room and go up the stairs and enter the attic. As you enter, examine the carrilon on the left and listen to the melody that comes from it. after that take a quick look at the darker parts of the scenario and then observe the pile of newspapers at the bottom. If you don't have a date to look for, though, there won't be much to do. Open the lower right chest and collect the lamp. Then read all the remaining paperwork and try to light the lamp with matches: it will stain the oil. now go out. As soon as you go down the stairs, on the left, there is a closed door but from the crack you can see the key inserted on the other side. Pick up the newspaper sheet located under the jar at the bottom left of the door and insert the newspaper under the door threshold. Use the awl to drop the key on the sheet of newspaper and pull it away from the door threshold. This time around, it looks like the good old key trick didn't quite get the way it was. Go up the stairs at the bottom of the scenery and open the windows to look out. Look at the crack in the wall and the lamps hanging from the ceiling.
Go back to the ground floor and call Jerry to report that the electricity is inexplicably missing. Your friend will arrange for a technician to come to your home to fix the fault. Then call Barbara to let her know about the letter in French and to ask her the favor of translating it as soon as possible. Phone Jerry two more times to find out more about the old inhabitants of the manor and to ask him to get you the combination of the safe that will arrive the next day. Put the sheet written in French in the empty envelope and write the address on it with the pen. Go outside the house and open the mailbox to read the technician's message: it seems that the long wait has unnerved him to the point that he has decided to leave. Then post the letter in French and go back to the house to call Jerry. He will tell you to check the fuses in the basement; the problem will be first of all finding the key to enter. Go back into the corridor that preceded the kitchen, the one with the vases on the left, and if you have illuminated the latter with the light coming from the window, you will discover that the small striped vase contains the key to the cellar, just as immortalized in the photo found in the drawer of the servants' room.
Open the cellar door and go down the stairs. Observe the fuses to learn that they are all down and in perfect condition, but nevertheless the light does not come back. Look around and take a look at the eerie furnace that occupies the entire wall of the room. On the ground there will instead be a trap door and above it a valve that you must try to operate, without success, of course. Wait a few more moments in the cellar to read some truly suggestive personal impressions of Michel. Call Jerry back and inform him about the situation in the house. He will tell you to look for candles. If you followed this solution and then explored the whole house, you can continue the game by calling Jerry. At this point, going to sleep will be the only alternative. But first go back up to the attic and in the pile of newspapers, find the date Jerry told you about the murder in the Blackwood house. Now go to your room and go to bed to be catapulted into a dream. Move to the African room to find that behind the large panel containing the elephant tusks is a door. Pick up the hammer on the ground and the dream will end. Now you will really wake up and feel scratches coming from the fireplace. Use the stethoscope on the latter and then go down to the living room to use the stethoscope in that fireplace as well. The noises come from the cellar. Then go to the kitchen and try to open the door that leads down to the cellar.
Sunday October 13
As soon as you wake up, you will find that the day is certainly not the best and that the storm shows no sign of abating. Go down to the living room and call Jerry to know he won't be able to join you at Blackwood Manor due to the rain. But you will manage to get the combination of the safe that you discovered behind the painting the previous day. Return to the room in front of the African museum, reopen the safe by clicking on the sphere in the woman's hands and you will be able to read the construction license on the second floor of the house with a bank account and relative telephone number, as well as a blue key. Read everything and collect the key and then go up to the second floor until you get back to the door you tried to open using the awl and the sheet of newspaper. With the blue key, enter the room to find that it probably belonged to some artist with very precarious mental stability. After observing the paintings, go to the table and collect the key and the lid of the jar that you can find in the midst of a lot of useless objects. To the left of the table, look at the plan of the house and examine every single room: your bedroom, the African museum, the safe room and…? you will discover that an area of the house was initially built but subsequently, for some obscure reason, it was walled up and abandoned over the years.
Grab the hammer on the stool to the left and then open the second door there to get to a new scenario. There will be a rope coming down from the top of the room and a ladder: climb up for a few clicks and cut the rope at the top with the knife to make it fall down. Between the jars, take the oiler and clean the dirty container with the rag you found in the bathroom to find that it contains oil. To pour the oil into the lamp, pierce the container with the awl and then pour it all into the oiler and then into the lamp to make sure you can have light if we need it. Collect the rope on the ground and exit through the other door to be able to unlock the entrance to that room that the day before was inaccessible because it was closed from the inside. Remember your strange dream made during the night? Just go back to the African room, go near the bulletin board with the elephant tusks and pour the oil using the oiler on the wheels hidden by the panel that you have already slipped away the following day. With the help of the large handle on the front of the cabinet, move everything away to find yourself in front of a barred door. Take the hammer (just as seen in the dream) to leverage the planks blocking access and enter the room. The environment will be dark, turn on the lamp. A mask will appear in front of you: examine it and then turn left to move the bamboo canes and get some natural light in the room. Then read the documents you find.
Now it's time to find out what's in the secret room hidden in the wall between the safe room and yours. Arrive in front of the door of the safe room, and turn left: you can interact with the wall. Use the butcher's knife to cut some of the wallpaper and see bricks blocking access to the room. The only way to get there will be to abseil from above. Go back to the attic until you reach the big crack that you saw earlier, with the hammer make a hole and tie the rope to the lamp that is above. Look down and pick up the rope so that it goes through the hole you just made. Go back one click and turn to the window, open it and grab the rope you see at the top right. Then try to exit the window three times (your character will be somewhat scared at first, but a few more clicks will give him courage) and head to the small room. Inside the gloomy setting, you will notice the blocked exit and cubes on the ground that form a name with their respective numbers: write down everything, you will need it later. Open the first drawer to find the birth certificate of a person who has spent part of his life in that house. Maybe she is still alive and can give us some information. Go back to the room where there are the piles of newspapers and look for news about the baby who was in the past in that room: you will find that he died a few days after giving birth and with him also your hopes of obtaining information about the house from a his old master. Go back to your bedroom and write your book for a while, then read the pages and go to bed. The dream of the night before will continue and you will have to go back to the African museum but this time you can enter the mask room. You won't find anything, we might as well turn around and go back ...
This time you will be really awake and you will have to go down to the cellar to discover the origin of the sinister noises. Arrive in front of the furnace and turn on the lamp: go inside this huge machine until you reach a dead end. Strange, but it seems that the mouse pointer does not want to know to move ...
Turn around, exit the furnace and go back to your room to rest peacefully until the next day.
MONDAY 14 OCTOBER
It is morning and it seems that last night's storm has finally stopped. Go down to the living room and light the wood in the fireplace next to the armchairs to warm up the house a little. Call Jerry to inform him of the night just passed and then dial Barbara's number, without getting any results. Exit outside and go to the tool shed and use the last key collected to gain access to this environment. As you enter, examine the bicycle to see that it is connected to a dynamo. keep this particular in mind. Go forward one click and examine the work table for a screwdriver and pliers while near the barrels on the ground you can pick up a crowbar. done that, go home, specifically in the safe room. Approach the mirror on the bedside table and unscrew it using the screwdriver. Then go down to the cellar and using the crowbar first and the hammer after, turn the valve initially blocked. Remember to collect all used items again. By doing this the water should be back. Go to the kitchen and try to open the taps but there will still be problems with the plumbing. Now go out and walk towards the crypt and cut off the wire with the pliers. Once this is done, enter the cramped environment and examine the plaques at the base of the two coffins to find that the Blackwoods died the same year. Then pick up the stone at the bottom left and open the coffin at the bottom to find the corpse of a woman. Of course, open the upper coffin as well. Once this is done, go down to the basement and examine the various tombs, even the one with the writing not very legible. Go back upstairs and throw the stone at the dome of the crypt, but you will miss the target. Go down again to the floor below, take the stone again and repeat the same operation, this time successfully. The light will filter into the room exactly above the candlestick. Combine the mirror and the wire in your inventory and attach everything to the candlestick to deflect the light. The illegible plaque now has the letter R as initial. If you remember, in the child's room, the cubes on the ground formed the word OBIN. Return to the room to find out what number the letter R corresponds to to get the name Robin and the combination 59097. Call Jerry to update him on what happened and he will tell you a date: go immediately to the attic to look for her and you will find a new telephone number. Call this new number and receive invaluable information regarding Mrs. Blackwood's death. Go back to the exit and collect the letter in French now translated by your secretary Barbara. Read it and you will learn of a photograph hidden in the servants' room, under a loose plank in the floor. Go back to the aforementioned room and examine the nightstand next to the bed. Move the plank below and you will see a photo of a man who is burying his wife in the garden, right where the shadow of the tallest tower in the house ends, an excellent reference point. Exit the house and go to the right of the fountain, at the crossroads where you can decide to go ahead or turn right, continue forward towards the greenhouse. To enter the new scenario, use the oiler on the handle to make sure that rust is not a problem for you. You will have in front of you a dead tree with a grate for the water drain underneath. Examine it and you will see a sparkle. Try to get the item, but to no avail. Then go around the tree until you find a tap, turn on the water and try to get the object back: it will be carried away by the water. Examine the pot on the ground on the right but you can't do anything. Turn off the tap and go upstairs using the ladders. Go forward one click and on the left you will see a shovel that is stuck: double click on the pump that is there on the ground to place it, then go to the work surface and open the drawers where you can read some material and take some shears. Use the shears on the plant in front of you to collect its leaves and fruit. Now go back down, take the other piece of pump and attach it to the tap. Turn on the water and go upstairs to pick up the shovel that was stuck in the earth. Pick it up and go back down, with the shears cut off the leaves of the plant upside down on the ground to let the water flow freely and then get out, go forward two clicks and turn right to reach a large tree in a kind of pond. .
Go back to the study and open the only drawer that was closed: inside there will be a small box with a combination. enter the numbers 59097 to open it. Although it may seem empty, the box has a double bottom that is unlocked by clicking once on the axis in the center and pressing one of the two buttons; once this is done move the axis again and lower the other button. Take the key and exit to the open and reach the chapel (same path as the greenhouse). Open the chapel with the key you just found and immediately go upstairs. Open the cabinet and browse the Bible until you find a nail. Go in front of the altar and look at the small ring below on the floor. Now look at the statue of Jesus and put the nail on the overlapping feet. move away one frame and use the lock pick with the ring on the ground, then go again in front of the statue of Jesus and with the lock pick straighten the word INRI to open the trap door below. Collect the branch on the table and immerse yourself in reading the arcane manuscripts present in the depths of the church. Go back to the house door and call Jerry. Go outside and prepare yourself a means of escape in case of danger. Open the mailbox to read that you have been evicted. Open the rear door of the car and disconnect the battery. take it to the shed and through the bicycle dynamo, recharge it. Reassemble the battery of the car and try to leave: apparently our character does not feel like leaving this mystery unsolved. Then go to the left of the fountain, along the paths you have already traveled and find the point where the shadow of the bell tower touches the terrewno. Dig there to find the poor woman's body. With the pliers, pry off a tooth and then re-bury it leaving it to its eternal rest. Go to the African museum and cut off the necklace attached to the statue using the pliers. Now go down to the kitchen and tirturate the two teeth with the grinder that you find on the table. collect the two powders and add them and then combine the mixture with the leaves and fruits you have. Go up to the top floor of the house and go back to the room adjacent to the one full of bricks: put the lid of the jar on the stove and then place the newly obtained mixture on it. Once heated, you will get a kind of amulet that you have to attach to the branch found in the hatch.
FINAL
Go to the African museum and use the magic branch in front of the mask to end the curse. Go down the stairs and try to leave the house. Go into the living room in front of the fireplace and you will find a grate: open it and go down to a place that has remained unexplored for too many years. Open the door you find and examine everything, then look twice in the hole in the wall to see the Scratches finale.