Black Mirror 2 (The Solution)
Abstract: The beauty of this graphic adventure lies mainly in the puzzles present, we advise you to consult this solution only in exceptional cases.
General advice: Whenever you are in a new location, click on the magnifying glass at the top right of the screen to view all the active points, interact with them immediately using the camera (this will allow you to unlock various extra contents in the main menu of the game). Many objects if observed several times will disappear from the location, this will allow you to focus on the really important elements. Remember that the protagonist will take certain objects only if they prove useful at a certain time, so if you are stuck during the adventure do not worry, many times just go back to the old locations and retrieve an object. As for the combinations of objects, it is not necessary to try them all, the cursor will turn red if the combination you want to try is correct or plausible. We also remind you that moving from one location to another will be possible through the postcard present in your inventory. That said we can begin, welcome to the second chapter dedicated to the Gordon family.
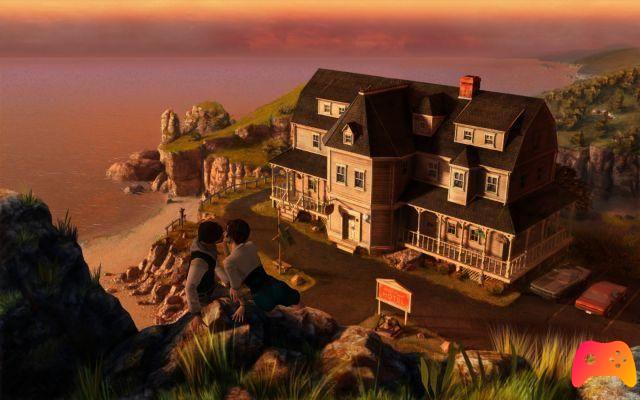
Chapter 1
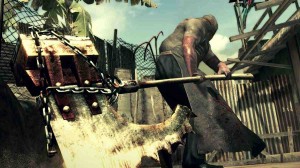
After the introductory sequence, you will take control of Darren Michaels and find yourself in the basement of a photo studio in the small town of Biddeford, Maine. Examine the shelves on the right to find a fuse box, use the right mouse button in the inventory on the box to get a working fuse. Interact with the electrical panel and replace the broken fuse with the one you just took. After that, activate the switch. Now you can take a picture of the electrical panel (to take a picture just use your camera with the object in question). Look at the boards on the right to make them fall and take the photo detector that was previously hidden. Go up the stairs to go to the shop. Look at the advertising sign near the door, take it and go out to place it. After that you will meet the beautiful Angelina. After the dialogues you will have to run some errands for Fuller. Take a picture of the door of the junk shop next door and go to the back yard; here too you'll have to take a picture, so use your trusty camera on the coat hanger. Go back to the main drag and proceed north to the dock, take another photo of the ocean here. Talk to the girl nearby and after the dialogue pick up the iron bar next to it. Go into the souvenir shop and talk to both the saleswoman and the customer, but you will find there is not much you can do, so go out. Go back to Fuller's shop and proceed south towards the square and then east towards Biba's Dinner. Take the last photo for this chapter of the doctor sitting at the table, then take the vinegar and bread from the counter. Crumble the bread using the usual right mouse button in the inventory, then talk to Mrs. Biba to deliver the letter and keep talking to her until you run out of topics. When you leave, you will also have a chat with the doctor. Go back to the dock and set off the convertible's alarm, at the same time you have to open the door of the shop to attract the attention of the gossipy customer who will finally let you talk to Rosie. Collect the package, but you will discover another one exists, continue talking to Rosie until you run out of conversation topics, then look at the pickup notes nearby. You can get them while Rosie searches for a package for you (you'll need to talk to her for the third time to succeed). Go out and go back to the photography shop where you will meet again Angelina who will give you the address where to take her photos once you have developed them. Talk to Fuller and enter the back door. Pick up the ballpoint pen from the table and examine the safe and the cuckoo with its hexagonal hole. Once this is done, use the telephone to call your mother. After the sequence you will find yourself at home with your mother in critical condition, listen to her heartbeat and call the ambulance. Collect the pill dispenser on the coffee table and the insurance card from the bag above the chair, then take the empty teapot from the stove and a bowl from the drawer under the sink. Go to the bedroom and open the drawers to get an address book, whose key is located under the plant near the window. Once the phonebook is open, use it on your home phone. Observe the picture near the bathroom door and collect the medicines from the cabinet, you can now reach the hospital. After a while 'wait you can reach your mother's room, here take the stethoscope and the laxative from the drawers, also try to talk to her. Exit the room and you will notice the strange guy who was previously stalking Angelina. Grab the magazines from the coffee table, then interact with the dispenser to get a soda. Go home and in the bedroom by clicking on the desk you will have to deal with the first puzzle of this adventure, a simple game of 15.
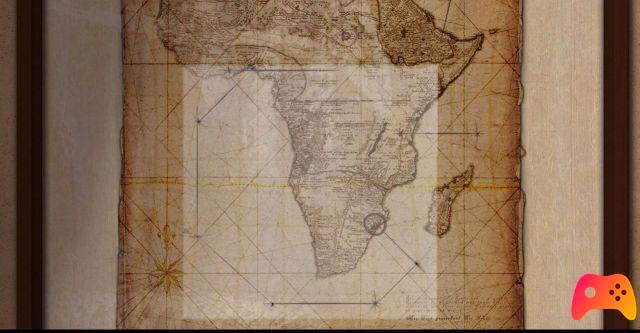
Once you have solved the puzzle you will find a chest and a bank book that you will have to read to find the payment of the insurance; you will also find a letter that should be read in the same way. Go back to the hospital and inform the nurse about the payment made. Go back to Fuller's shop and eavesdrop on the door with the stethoscope, but it will be useless. Go to the back, collect the bowl from the dog's cage and the handle from the bucket by interacting with it. From the tool shed, take the line, then the tow rope over the car. Combine the line with the handle and use them on the skylight to break open the door. Now you can enter. After the sequence, re-enter and analyze the camera to find that the film is missing. Go to the basement and interact with the strings, Fuller will appear and fire you. Enter the junk shop and talk to Eddie. Buy the wire cutters and watch the radio, talk to the junk dealer again to find out about a coin, check the price from the catalog on the counter, tell him and Eddie will then instruct you to retrieve his cane. Go back to the souvenir shop and look at the brochures on the right, then talk to Rosie and the client (in no time, and with the help of the magazines collected previously, you will convince her to have a photo shoot by Fuller). Exit the shop and use the ballpoint pen on the blank note, give it to Rosie who will point out that the signature is missing! Go back to the photo studio to make sure Fuller is leaving and then go talk to Miss Biba to find out what happened to the postman; it seems that he went to the hospital so you just have to go there. Once in the hospital, talk to the nurse and go to the room where your mother is hospitalized; here you will find greeting cards. Collect the one signed by the postman and use it on the blank note to forge the signature. Now that you have your signed note, give it to Rosie who will give you the photo paper in exchange. Go back to Fuller's study, the main door is locked, but no problem you will enter from the back. Use the stethoscope on the safe. Here is the combination: Right (left mouse button) 90, Left (right button) 50, Right 70, Left 20, Right. You will get the roll of Angelina's photos. Before leaving the study, examine the map and the note alongside (you may also want to take notes, but with our help you won't need it). Enter the dark room and collect both the distilled water at the foot of the cabinet and the fixative on the work table. You are ready to learn how a photograph develops. Here is the step-by-step procedure: 1) Put the roll in the roll holder. 2) put the detector in the roll holder. 3) interact with the container and pour the contents into the sink. 4) put the fixative in the container. 5) interact with the container again to get the negatives. 6) put the negatives in the enlarger. 7) in the inventory with your faithful right click on the package that Rosie gave you to get the photo paper. 8) use the paper with the enlarger. 9) activate the magnifier for 5 seconds. 10) put the detector liquid in the tank on the left. 11) dilute everything with distilled water (As Giovanni Muciaccia says: FACT?). 12) use the imprinted sheet obtained with the vachetta and pull it out after the photo is fully visible (about ten seconds). 13) put the distilled water in the water tank. 14) immerse the photograph in it. 15) repeat the whole procedure for the second and last time starting from the photographic paper in the enlarger. Et Voilà, you have become perfect photographers. The doorbell will ring, Miss Biba will deliver you a letter to be delivered to Fuller, of course you will have to find a way to open it discreetly. Go back to your home, fill the teapot in the sink and put it to boil. When the steam starts to come out, use the letter, the steam will dissolve the glue and you can read its contents. After you've done somebody else's business, you can drop the letter in the door of Fuller's office. Go to the pier and look at the sign, now you will have another location: the hotel; go there. Enter the hotel and talk to the doorman, insist on poker until Eddie's stick is returned to you. Go back to Eddie and give him his beloved cane. Returning to the hotel, go up the stairs to reach Angelina's room. After a long cutscene, interrogate the doorman, go out and go to Eddie again to borrow the projector. Go to the hospital and talk to the doctor in your mother's room, this discussion will instill within you a sense of deep doubt about your origins and those of your mother. Go to Biba's restaurant and outside take one of the light bulbs that decorate the entrance. Once this is done, go home to your bathroom to develop the photos you took a short time before of Angelina (don't worry, this time the development will be automatic and, if you have followed our solutions step by step, you will not waste time searching for objects. to use). Once the photos are developed, you will have reached the end of the first chapter. Enjoy the sequence.
Chapter 2
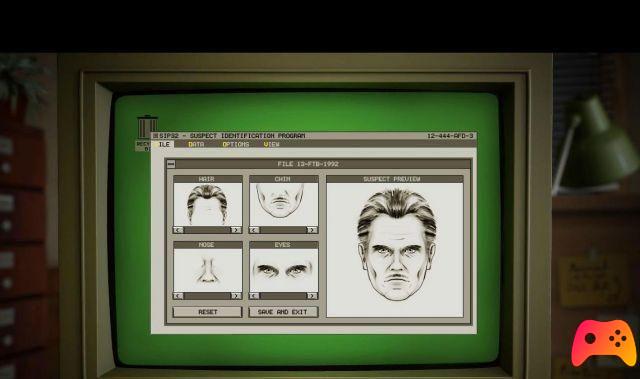
Go to the police station and talk to the right person. You will have to provide a detailed identikit of the guy who followed Angelina (all the information will be present in your diary, but as always we have decided to make your job easier). Here is the dentikit:
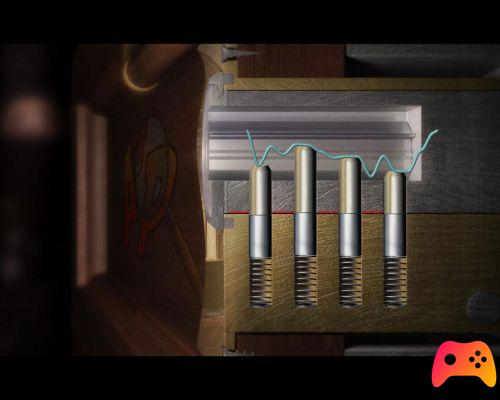
Meanwhile, Angelina will be taken to prison. Take your usual chat and you'll find out something interesting about Fuller's body. Photograph the policewoman in charge of the identikit and the mugshots on the whiteboard, then leave the police station. It's raining outside, go to Biba's Dinner and take a nice picture of the waste bin, Look at the bin and recover some torn pieces of paper, your task will be to put them back together (this puzzle is very simple, start from the edges and rotate the pieces of paper with the right mouse button). Once this is done, go to the hospital, talk to the nurse and try to collect a delivery note, but it will be impossible for you as long as the nurse is in her place. Go to your mother's room, show her Angelina's photo and look at the monitor with its cables, unplug them to distract the nurse. At this point you can collect the delivery note, give it to the guard, but you will also need liquid soap to get through. Have two more chat with the nurse and then go talk to the doctor and Miss Biba at the diner. Go to the back of Fuller's study and use the rope on the window, then use the bar with the rope to open a passage in the grating that will lead you to the basement, but first regain possession of the bar. Take a look at the floorboards to discover some sort of weighing mechanism. Do you remember the map in the study and its locations? They were a clue to this puzzle, but all you have to do is pull the strings in this order: 4-1-5-3-2. You will discover a secret door, but at the moment you do not have the code to open it. Go to the darkroom and photograph the silhouette of Fuller's corpse. Go out and hand the projector back to Eddie and have a few words. Go back to the souvenir shop, you will find a package on the ground that will be collected. Talk to Rosie and the hotel doorman and then go to the hospital. Take the scale under your mother's bed, talk to the guard to find out you will also need a pass, discuss this with the nurse. Go to the diner and have Biba serve you a coffee, spill it on the doctor who will be forced to leave his smock to clean himself. Steal the doctor's pass by interacting with the gown. Now you are finally able to get past the annoying morgue guard. Examine all the folders on the wall until you identify Fuller's. Open the corresponding cassette and collect the syringe from the trolley. Use the scales on the empty stretcher, but you'll have to distract the guard. Use the syringe with the laxative and then with the soda. Offer this delicious drink to the guard and you will finally have free rein. Take a picture of Fuller's corpse, weigh the empty stretcher first and then the one with Fuller on it to find out the weight. You are now ready to go back to the basement. Here Darren will automatically place weights on the door platform. To open it you still lack the code and getting it will not be easy at all. Examine Fuller's keys and use them on the hexagonal hole of the clock in the study, by doing so you will obtain a small box inside which will be four negatives. Here is the most frustrating puzzle of this game, you will have to use the negatives on the light table, rotate them and arrange them one on top of the other until the code 2482 appears in bold. There is no precise method to do this so arm yourself with all your patience. Once you have succeeded in the enterprise enter the code on the numeric keypad near the door and get ready to enter the room of horrors. Pick up the brass ball from the bed. Try to open the closet. but a mechanism prevents it from opening. Interact with the curtains to discover a metal plate on which you will have to use the brass ball to activate the mechanism and open the cabinet. Take the photos from the closet and go out. Go to Miss Biba first and then deliver the photos to the police station. After the sequence, go to the hotel and make the porter's nightmare about seagulls come true. Use the crumbled bread on the porch and, as soon as the doorman comes out, take the opportunity to get the keys and enter Angelina's room. Here, take the last photo of the chapter of the glasses on the coffee table, then examine the lamp for a bug and the ventilation grille for a transmitter. Exit the hotel, examine the transmitter and go to Eddie who will need some items (and we'll get them for him, right?) To encrypt the signal. Go back to your house and take the compass above the telescope and the headphones behind the TV, then go outside the diner and use the wire cutters on the electric cable, and again on the piece of cable you just got in the inventory. Go back to Eddie and give him all the items. You will find yourself following the signal, just position the needle at 73 degrees and press the red button. After the interlude you will find yourself on the boat of your fugitive. Take a look at the seat to ascertain the contents, then go below deck. Examine the photo on the wall to discover a safe, collect the photos under it and analyze the right seat to realize that it is locked by a lock. Click on the computer and the mystery will deepen. Take the folder on the desk and open the drawers to get a key that you will need to open the seat.
Once placed in the right position, you will be given the coordinates that you must enter in the safe. The coordinates are: South-West / South / South-East / East / North-East / North-West (alternately press the left and right mouse button). You will get a ring and a floppy disk to use in the PC. Unfortunately for you, however, the current is not enough so analyze the generator and you will notice that it is out of petrol. Exit, take the tank from the seat at the entrance of the boat and use it with the generator. At this point you can use the PC, but at the best you will be discovered (don't tell me you're scared eh). You will find yourself with a pointed gun and you will have very few seconds to interact with the boom and save your life (in case of death do not worry, the automatic save will make you start over from this same point). After the cutscene, go to the hospital to learn some terrible news. Congratulations, you have finished the second chapter! After this part of the adventure, however, avoid offering correct sodas to your friends.
Chapter 3
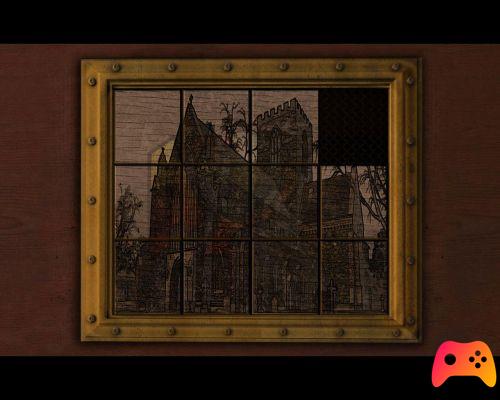
Black Mirror lovers, welcome back to Willow Creek! Examine the pile of leaves and enter the hotel to talk to Murray. After the discussion, examine the postcards and take one, then take a look at the souvenirs too. From the table take the liqueur and the knife. Look at everything behind the counter and talk to Murray again. After entering your room you will need to find a way to enter Angelina's room (number 13). Examine the ashtray on the coffee table for matches, then look at the clock above the bookcase and use the knife on it; you will have a couple of batteries. Look at the newspaper and tear off a page. Are you ready to turn into an arsonist? Exit the hotel and use the newspaper on the pile of leaves, then set it on fire. Go back in and talk to Murray who will leave you free to steal the key to room number 13 and enter Angelina's room. Interact several times on the bed to get a piece of wool and to move it. Now look at the picture of Angelina hanging on the wall and take the two pieces of paper. Open the cabinet under the TV and you will find a sleeping pill. Use the liqueur on the glass and the wool thread, turn it on and use the sheets of paper just taken from the glass to read the message left by Angelina. Before going to Willow Creek, take a good look at the lid. After the chat, go up the bridge and photograph the street, then enter the museum. Look at the broken cabinet and the soapy mixture on the counter, then have a chat with Bobby. Open the cupboard to see the contents and look at the cabinet alongside. Read the book and notice the lock. Read the history on the desk to the right of the screen and enter the dark museum. Here, just observe everything around you. After that, talk to the tourist couple and again with Bobby. Go out and go to the carnival, here talk to Tom to get a nice plate of chili that you will give to Bobby in exchange for a flare. Soon after, talk to Bobby who will let you take the mixture, open the cupboard and Darren will automatically pour liquid soap into it. Exit, near the bridge there is a rope, interact with it and you will pull up a bucket of water. Use the mixture on the bucket and you will give Bobby a good reason to get distracted. Take the key from his jacket and use it in the cabinet lock. After the sequence, go to the pub, take a picture of the mugs on the counter and talk to the tourist couple. Go back to the hotel. You'll need to get hold of the letter, so you drugged Murray's cup with the sleeping pill while reading the paper. The letter is in a safety deposit box, so you will need a burglar tool. Head back to the pub, get Tom drunk and you will have your gear to use in the hotel safe. To do this you will need to shape the wire so that all the weights are on the same line (keep an eye on the red bar).
Take the letter and read it. Go through the bookcase and get the Brothers Grimm book. Now match the numbers in the letter to the titles of the fairy tales. It follows that 62 corresponds to a bee, to 17 a snake, to 1 the frog and to 25 a crow. Go back to Angelina's room and click on the lid. Turn the central circle to arrange the numbers like this: N 1 E 62 S 25 O 17, then turn the small circles to match the numbers like this: N frog E ape S raven O snake. You won't be able to go down due to the dark, so go back to the lobby and grab a souvenir that you will put the batteries in. You are now ready to go down. Go around the corner to the left, then go right and pick up the metal bar. Now continue in order in these directions: Right, Right, Forward left, Left, Back right, Back right and you will find yourself near a grate. Use the iron bar on the grate, but don't do anything else if you don't want to die a sensationally stupid death. Go back into the tunnel and continue up, collect the wooden beam and return to the grate. Use the wooden beam on the grate and you will finally be able to proceed further. Proceed in these directions: Back Left, Right, Right. Examine the tube to collect the piece of dress. Now all you have to do is go down the tube. You will arrive in a completely dark room (luckily a higher mind gave us the hotspots). Examine all the active points, you will collect a rag and a metal tube. Soak the rag in the bucket of oil, twist it around the metal tube and set it on fire with your faithful matches. And there was light! Take a nice photo of the water tank, then remove the metal pole from the door and route the cables under the electrical cabinet. Interact with the cabin to turn on the light and open the door. You will be trapped! Observe and collect: the gas lighter, the chain, the tray and the screwdriver. Analyze the prison lock, then use the knife first on the bars and then on the tray. Pour the mixture of powders thus obtained into the lock. Use the gas lighter on the stove, then the flare that once lit you will have to rest on the lock to return to being a free man (Wow, an escape worthy of the best MacGyver). Turn on the light by interacting with the strange object, then indulge in your favorite hobby (escape death? No, photography). Take a picture of the compressor and the corpse inside the middle locker. Take: the dinghy, the box with the rockets, the hose, the fuse from the right cabinet and the dynamite from the left one. He unscrupulously searches Boris's body for a poem and electrical tape. Examine the junk, then open the hatch and go down. Here, take the wrench and gloves, also examine the locked hatch. Use the dynamite and the fuse on the hatch, connect the fuse to the detonator upstairs and BOOM! Nothing to do, take another fuse and another stick of dynamite. Repeat the previous process by attaching the dynamite to the beam. The beam now blocks the hatch, to unlock it first use the chain and then the inflatable boat; interacting with the dinghy the beam will rise thus freeing the passage. Go down and look at the grate on the top left and the cables on the right. Combine your gloves with electrical tape and use them on cables. Go up to the prison and lift the lever on the left, so you can go back and retrieve the second hose; connect and tie them both to the water tap and to the hatch that has shown you so many pains. Turn on the water tap and you will flood the room below. After your swim, you need to be very quick to use the wrench on the grate to return to the surface. Take the chain on the right and open the door with the button. Examine the rocks, the cart and the crack. Put the chain in the crack and try to connect it to the trolley, but you will find that a wheel is missing. Go back to the prison room and use the wrench on the compressor to get a flywheel that you need to connect to the trolley. Push the trolley to damage the axles, interact with them until all are removed. Once removed, take a picture of the hole (and for this chapter too we photographed everything). Connect the chain to the cart and click on the rocks to load it, to move the cart permanently you will have to collect and use an axis that you will find nearby. Proceed past the crack. Interact with the door to complete the third chapter.
Chapter 4
Bound like salami to a chair, good! Don't worry now we will solve it. Examine the bottle and interact with it to place it on the light beam. Take a piece of glass and use it to open the bottle. Pick up the old rag and soak it in kerosene. Take another piece of glass and use it on the window to light a small fire. Take the piece of wood, ignite it and use it on the knots to free yourself. Collect the mannequin, box, rope and pieces of rope. Pull the sheet and look at the Gordon family tree. Click on the strange spot and you will get a toy car. Walk out the door to see the situation. Okay, now we're gonna set a nice trap for Bobby. Use the rope on the bale of linen and then on the beam, then place the mannequin and the head on the chair and cover everything with the sheet. Use the toy car on the door and get ready to knock Bobby out. Go down the stairs, collect the toy car and the sandwich paper. Try using your cell phone, but it will prove useless. Analyze the chest and its decorations. Approach the fireplace and take a piece of coal, then use the paper on the decorations to recopy them. Use the carving on the piano and you'll face another puzzle. The dots represent the key, not the notes; the lower represents the first key and gradually grows. You will have to press these notes: do-mi-mi-re-sol-mi-re-mi (for those unfamiliar with the notes: 1-3-3-2-5-3-2-3). Now interact with the lock on the trunk and enter the code 3-2-5 to open it and get your stuff back. Tell the truth, you missed your camera right? Well, use it now to photograph the piano first and the statue on the right once you exit then. Talk to the kid on the left and offer him the toy car, in exchange he'll get you the ax. Now go to the garden. Turn on the tap only to realize it works, then pick up the garden hose and use it with the ax. Continue towards the swamp, here try to take the hook, but you will not be able to do it with your bare hands, so use the ax. It is an ax moment gentlemen, so use it also on the plants near the statue that you will later tie with the piece of rope to build a tripod. Go back to the swamp, look and pick up the pulley and take a picture of the monolith. Enter the crypt, look at the sarcophagus on the right and use the pulley on the tripod. Take the cargo straps and combine them with the sarcophagus, now interacting with the pulley you will be able to lift the sarcophagus and you can go down. Take the tube and join it with the hose (you will have to heat it with the blowtorch), then look at the poster and keep in mind the blood groups you will see. Take the folder and read the documents, click on the safe and enter the blood groups previously seen (ABBA-0) as a combination. Check the contents of the safe and return to the surface. Go back and use the hose first on the swamp and then on the tap which of course you will have to open. Go to the castle and get chased by Tom who will fall into your trap and leave you the car keys. You will find yourself in the hotel where you will receive a letter, read it. Go back to the museum, interact with the cabinet and hide in the closet. Take the chewing gum in the waste bin and open the cabinet lock with the key. Read the book, pick up the plank and use it on the shredder, get on it and use the gum on the skylight. Interact on the skylight to exit the museum. You will automatically go to the mine, in this part you will have to be very fast. Hide in the elevator, then enter the bunker, close the door and ward it off with the metal bar. Lower the left lever and go to the water tank room, here interact with the electrical cabinet to close the door. Collect the iron bar and the hose, combine them and use them on the pipe to continue the escape. Follow these directions: towards the tunnel, left, left and forward left. Remove the wooden block and continue towards the tunnel. Follow this path: forward left, back left, left, forward right, right, back left, left, left and to the entrance. You will find yourself in Angelina's room first and then at the lighthouse. Examine the weed and… surprise!
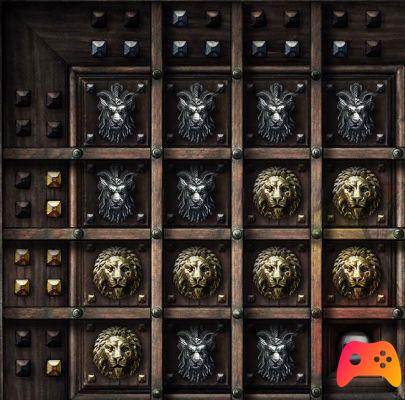
Chapter 5
You are in the middle of a nightmare, interact with the tree, the tomb and the entrance to the lighthouse; doing so you will awaken. You have just discovered that your beloved Angelina is dead, but nothing will stop you from taking a magnificent photograph of the stone head. Continue to the lighthouse and take another photo of the burnt grass. Take the knife, read the note and click on the crack to get a chess piece (the King). Go back to the academy, use the knife on the bushes and go to the ruins. After seeing the crow, talk to Ralph and return to the ruins. Analyze the stones and the grass to get two more chess pieces (a pawn and the Queen). Go back to Ralph, where you will get the horse after giving him a whistle which you will make using the knife on the twig. Now that you have all the pieces, arrange them in the openings of the board like this: the king to the north, the pawn to the south, the queen to the west and the knight to the east. Doing so will open the stone slab. Enter and photograph the stone pedestal, then interact with the backpack, read the diary and the message. Click on the sleeping bag, exit and go to the Black Mirror castle. Obviously the gate will be closed, take the branch on the right to force it. Numerous dialogues await you, pay attention to all topics, it is important. Photograph the Gordons family tree in the library, then look at the strange stain. Grab some thread from the basket at Eleanor's feet. In the center of the room, examine the globe, plaque and railing. Try to open the door at the bottom left, but it will be impossible for you (that's exactly the same damn door you didn't manage to open during the previous Black Mirror, but this time we will). Go up the stairs and enter the bathroom here carefully examine all the active points, after that go down the stairs and go to the kitchen. Get your boots and a teaspoon while you're at it, meet Sally. Open the door in front of you and you'll find yourself in the stable. Combine the wire with the teaspoon and used on the stairway to get the crow's attention. Take the ladder, lean it against the well and click on the nest to get the first piece of the mosaic. Collect the hammer from the toolbox and talk to Louis. Before going back inside the castle, get your boots dirty in the mud. Talk to Sally, look at the teapot and try to get it, but Sally will stop you. Go into the bathroom and dirty the floor with the boots, tell Sally that she will rush to clean and let you take possession of the teapot. Go back to the main room, try to eavesdrop on the library door, but you will be scolded by Eleanor, talk to him. Talk to Louis again, on your return you will be able to access the library again; here put the teapot on the table and use the telephone to call the hotel. Exit the castle, go back to Willow Creek, break open the door of the pub (same modality as the previous puzzle) and take the tea from the table. Return to the castle, put the tea on the library table and talk to Sally. Chat with Victoria, then use the hammer on the plaque under the globe. Go to the bathroom, look in the mirror and use the hammer on the tile indicated by the ghost, you will get a sheet of paper that you obviously have to read. Go back to the railing and press buttons 2-4-5 in order from left to right. Interact on the plaque and take the other piece of the mosaic. Knock on Bates' room and talk to him, then go to the bathroom, grab the mop and use it in the tub. Turn on the tap and you will flood the bathroom. Tell Bates what happened and then Sally, you will now have free rein. In Bates' room, take the key from the headboard of the bed and use it with the top right drawer. Examine the document to find the encrypted combination of the chest. Here is step by step what you need to do to crack the code: Examine the painting near the bathroom, talk to Victoria and Eleanor, examine the family tree, talk to Sally, then to Bates, and again to Sally, go back to talk to Victoria, use the phone near the bathroom to make a call, go back to Sally who will give you a bag, go out of the castle and observe the 3 statues of the nymphs, check the mailbox and read the letter addressed to Bates and talk to Victoria. You will finally have deduced all the symbols necessary to open the chest, namely: a rose, a star, a knife and a cross. Go to Bates' room and enter the symbols in the chest like this: N cross, E rose, S knife, O star. You will get a key and a medal with ... your photo (twist of the gamer friends)! With this key you can open the mysterious door in the main hall. In this new location, immediately take a photograph of the wall mirror (and also for this chapter the reportage is complete). Examine the mirror and you will notice a mechanism. Collect the small wooden disc and you will discover that it belonged to Ralph, you just have to go back to him, who will give you a sliding puzzle.
I was kidding, here's how you have to arrange the tiles to get hold of the ball.
Go back to the wall mirror and use the ball on it, a small game of skill will start in which you have to drop the ball in the center (any explanation would be superfluous, it's very simple). Enter the secret passage. Open the drawer on the right to get the third piece of the mosaic, then click on the music box and you will also finish this chapter. We are almost there, soon you will be really shocked.
Chapter 6
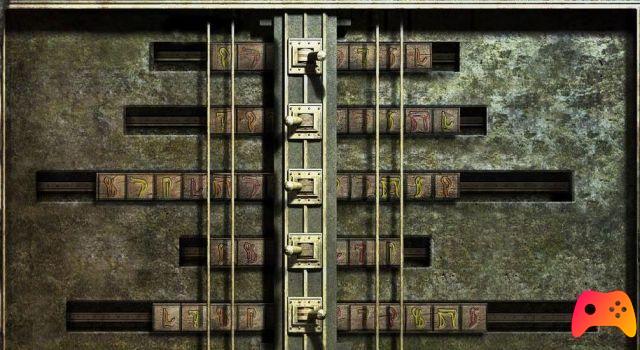
You will know your real mother and you will find that you have been infatuated with… your sister! (to put it to Eurotrip's Cooper Harris: you made out your little sister). Once recovered from the shock proceed towards the stable. Talk to Louis, then go to the bathroom and photograph Sally's body. Open the water tap and close the window. Examine the girl's body and the letter drawn on the tub tile. Try to get out of the bathroom and you will find that the castle is burning. Take a towel from the drawer, wet it and use it to go out and go to the main room. After the sequence, take the candles and the oil lamp, combine them and use the lighted lamp on the stone pedestal. Insert the mosaic tiles into the pedestal and the door will open. Take the XNUMXth and last photo at the gate in front of you, then examine the side doors and stone platforms. Pick up the paper from the ground and read it, then climb on the third platform from the left to trigger a trap and be able to pick up a knife. Step on the second platform from the left and the door behind you will open, then step on the third from the right and talk to your sister. Order your mother to stand on the left slab and proceed through the door. Read all four panels to solve the related riddles. Interact with the mechanism and arrange the symbols in this way: N fire, E mill, S snowflake, O bellflower. Take the three sticks from the compartments and go back. Insert the golden stick in the first plate on the left, the blue one in the first on the right and finally the green one in the fourth from the left. Order your mother to move to the right slab and go to the right door. Examine the panel, sprockets, ropes and symbols. Interact with the panel and arrange the tiles and switches as shown in the figure.
Press the button and cut the third rope on the left from the panel with the knife. Go back and talk to Angelina, you will open the gate. Click on the container to open the door as well. Exit, re-enter and enjoy the final sequence.
Congratulations, you have finished Black Mirror 2 and on your own terms. I remind you that at the end of April the last chapter of the saga will be released which will shed full light on the events of the first two chapters. Don't miss it!